SAMPLE PARCHMENT PHOTO CORNERS
I have a few simple corner finishes for Parchment for those of you who may not have a Photo Corner Punch. You can click on any picture to see more detail


Tape parchment to cutting mat, border aligned to the lines on mat. Draw a diagonal line in white pencil, use a ruler and craft knife to cut.
You can if you wish cut a double line for your backing paper to slot through or stay with a single cut
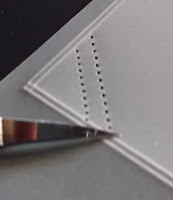
DIAGONAL PIERCED CORNERS


Note the placement of needle when piercing subsequent holes
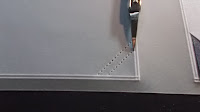
As above, draw diagonal line with white pencil then move to a Piercing Mat and with a Two Needle Tool pierce along the line. If you have a GRID then you can use this to pierce through (it does help space the holes evenly)

 Use Parchment Scissors to cut the parchment. Place Scissors into two holes, twist scissors slightly towards you and then cut...you will hear the snip. continue this until all holes are cut. (Note scissors are pointing away from corner). When cutting for the double line first cut as for the single line then turn work around and cut facing the corner.
SNOWFLAKE CORNER


 Emboss Snowflake on back of Parchment. Turn over and once again Pierce with a Two Needle Tool on a Piercing Mat.

 Use Parchment Scissors to cut between the holes as before. Then slip in your backing paper.

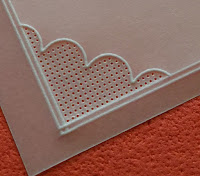
SCALLOPED CORNERS


 These next corners can be used with TWO pieces of Parchment, One for your main image and the other would be your backing sheet.
Using Groovi Border Plate emboss the scallop (you can emboss it the other way round too) Turn over and as before Pierce on a mat then cut with Parchment Scissors. Take note of the positioning of the scissors. (this is solely to get your 'points' in the right direction). You can colour the center of the scallop or leave it plain.


PIERCED SCALLOPED CORNER

 Using the Border Groovi Plate Emboss the Scallop as before. Turn over and fix to Grid. The one I use is a 2 in 4 (I can use a 2 needle or a 4 needle tool) Use a two needle to pierce the holes. If you do not have a grid then you can colour or emboss another design into the corner before you go on to piercing and cutting.

 Once again using the Two Needle Tool, pierce along the Scallop as in photo then cut along with Parchment Scissors.
Once you have finished and slipped in your backing sheet, you can then use a bit of glue or tape to attach your design to a Card Blank without them showing through.
I hope that these may be of help to you
Happy Crafting
Hugs
Emma xx
I have a few simple corner finishes for Parchment for those of you who may not have a Photo Corner Punch. You can click on any picture to see more detail


Tape parchment to cutting mat, border aligned to the lines on mat. Draw a diagonal line in white pencil, use a ruler and craft knife to cut.
You can if you wish cut a double line for your backing paper to slot through or stay with a single cut
DIAGONAL PIERCED CORNERS

 |
| Note the placement of needle when piercing subsequent holes |
As above, draw diagonal line with white pencil then move to a Piercing Mat and with a Two Needle Tool pierce along the line. If you have a GRID then you can use this to pierce through (it does help space the holes evenly)


Use Parchment Scissors to cut the parchment. Place Scissors into two holes, twist scissors slightly towards you and then cut...you will hear the snip. continue this until all holes are cut. (Note scissors are pointing away from corner). When cutting for the double line first cut as for the single line then turn work around and cut facing the corner.


SNOWFLAKE CORNER


 Emboss Snowflake on back of Parchment. Turn over and once again Pierce with a Two Needle Tool on a Piercing Mat.
 Use Parchment Scissors to cut between the holes as before. Then slip in your backing paper.
SCALLOPED CORNERS


 These next corners can be used with TWO pieces of Parchment, One for your main image and the other would be your backing sheet.
Using Groovi Border Plate emboss the scallop (you can emboss it the other way round too) Turn over and as before Pierce on a mat then cut with Parchment Scissors. Take note of the positioning of the scissors. (this is solely to get your 'points' in the right direction). You can colour the center of the scallop or leave it plain.


PIERCED SCALLOPED CORNER


 Using the Border Groovi Plate Emboss the Scallop as before. Turn over and fix to Grid. The one I use is a 2 in 4 (I can use a 2 needle or a 4 needle tool) Use a two needle to pierce the holes. If you do not have a grid then you can colour or emboss another design into the corner before you go on to piercing and cutting.
 Once again using the Two Needle Tool, pierce along the Scallop as in photo then cut along with Parchment Scissors.
Once you have finished and slipped in your backing sheet, you can then use a bit of glue or tape to attach your design to a Card Blank without them showing through.
I hope that these may be of help to you
Happy Crafting
Hugs
Emma xx
Paper Storage Unit from Recycled Cardboard
I recently made myself a paper storage unit for my 12 x 12 papers and as some interest has been shown in it I have decided to post a few photos and a description of how I made it.
You will need to cut 8 pieces of undamaged Cardboard. I cut them into squares of approx 12 6/8".
I also cut out 12 Rectangular pieces for the shelf supports. I cut these at approx 12" x 2 1/2". I covered each of these pieces including the 8 squares with White paper ( children's roll of play paper ).
I took one square and put Strong double sided tape around THREE edges - this is now the BASE.
I then put more tape along two opposite edges of another square - this is now the BACK.
 |
| Figure 1 |
Make sure that you butt up against the middle piece of Tape on the BASE. Remove part of the Tape Cover from the BASE and as you PRESS the BACK to the BASE gently pull away the Tape Cover.
You should always pull the Tape Cover away slowly in case you have a bit of a wobble with your panels.
The next step is to add the SIDE PANELS one at a time.
Butt up a Side Panel to the BASE making sure that the BACK piece will be covered. You repeat the process of removing the Tape Cover slowly while pressing against the bottom of the Side Panel. Then you remove the Tape Cover from the edge of the BACK in the same way.
Repeat for the other Side Panel and then you can begin to attach the SHELF SUPPORTS. Figure 2
Remember I covered my rectangles with paper, well the reason being is that as cardboard boxes are corrugated, the tape won't stick properly.
Put two strips of Tape along the back of each of your Rectangles - this will help keep the Shelf Supports in place. Also put a strip of Tape along the TOP Edge of all 12 Rectangles.
| Figure 3 |
 |
| Figure 2 |
Now you just have to go through the same procedure for the Shelf Supports all over again and then add another SHELF Figure 3 until you have....TA DA!!!
 |
| One Paper Storage Unit |
 |
| Here it is with my Papers added |
 |
| Here it is sitting in my Craft Cupboard |
Now go on give it a go! And if you do then make sure you BLOG it and I wouldn't mind a mention too!
xxxxxxxx
Poinsettia Flowers From Parchment
You will need a Die cutter (image 1) or you can draw the shape
freehand if you wish. (image 2 gives you the required shape). Using a Die will help with the veining but it is just as easy to do that freehand, which is what I will show you here. If using a die you can cut 3 LAYERS at the same time (the 4th Layer is in a larger size and different colour for the leaves). You will also need a FINE Ball Tool, Tumble Dryer Sheet or Soap (you only have to use either of these once on your parchment so that the ball tool GLIDES over it). You will need an Embossing Mat. (I use several different kinds....do not use a pricking mat for embossing, sure way to get holes in your work) I prefer to use the Pergamano Blue Embossing Mat, A5. It has a hard back, filled with foam and covered in a soft plastic...it has the right amount of GIVE when embossing, but I do use a firmer foam mat which is A4 in size if I am doing a larger piece.
 |
| image 1 |
Smooch your Parchment with either a piece of soap or a tumble dryer sheet. Cut the shape out freehand or through your chosen Die Cutting Machine. After this you will work on each layer separately.
If you use a Die then just follow the lines for the veining while parchment is still in the Die but you will have to remove it to work on the edges of each petal.
Step 2
With a FINE ball tool score the edge of the PETAL in one direction CENTER to TIP on ONE side. Do this 3 times for each petal. Turn each petal as you work. (I prefer to have the petal that I am working on nearest me...see image 2). Then you do the same for the other edge of each petal. The reason behind working this way is so that you are not really lifting the hand that you use. You will move your hand while embossing but your wrist should be in a comfortable position resting against your pad. You use your free hand to turn your work.
 |
| image 3 |
 |
| image 2 |
Step 3
Now you use your Fine ball tool to mark a line down the centre of each petal. If you look closely at image 4 you will notice that the very bottom petal line comes to an abrupt end...This is deliberate by me to show you the difference in the finish...this is what your line will look like if you do not lift your ball tool at the end of your stroke. Your centre line does not have to come all the way to the end.
You will then go on to use small curving strokes from the centre line up and out, lifting your ball tool at the end of the stroke to form the veining.
 |
| image 4 |
 |
| image 5 |
Step 4
Now turn your work over and taking a Large ball tool use it to make a depression in the middle...it's the only time you can use a circular motion on Parchment. Do this to each of the 3 layers in your chosen colour of Parchment (doesn't have to be white) and then repeat the steps in an alternate colour for your Leaves. (you only need 3 leaves, I cut a pair joined and a single leaf from image 6). Layer up your Petals alternating their position so as to hide any gap at the base of the petal. Use a small amount of any craft glue to stick together the layers ( the glue will not be showing but be sparing with it).
 |
| image 6 |
 |
| image 7 |
Step 5
The final stages. The 5 piece stamen that comes in the Die set is only embossed at the tip. Do not use a circular motion...you will end up with a grey spot that you cannot get rid of. Use small strokes with a ball tool in one direction and then again in another direction (cross hatching). you will see from image 8 how white the tips have become by doing this. You then turn the stamen over and using a large ball tool make a depression in the middle. Glue into the centre of your petals and finish of with a flat backed pearl. (I always add a bit of glue here too). As you will see from image 9 the placement of the Leaves, two together and one single. Leave to dry for a few minutes and then you can attach to your chosen project.
Image 9 is formed by using a Die to mark out the veining but in image 8 you can see that the veining is all freehand. I prefer the freehand myself, it's a bit more delicate.
 |
| image 8 |
 |
| image 9 |
If anyone has any questions or any requests please feel free to contact me either through my blog or by email. I will endeavour to respond as soon as possible.
Now go on give it a go!
xxxxxxxx
No comments:
Post a Comment