I have a few simple corner finishes that may help so I will get right to it!
You can click on any picture to see more detail

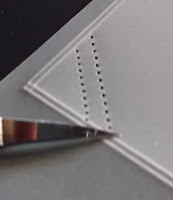
 Tape parchment to cutting mat, border aligned to the lines on mat. Draw a diagonal line in white pencil, use a ruler and craft knife to cut.
You can if you wish cut a double line for your backing paper to slot through or stay with a single cut
DIAGONAL PIERCED CORNERS
 |
| Note the placement of needle when piercing subsequent holes |
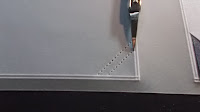
As above, draw diagonal line with white pencil then move to a Piercing Mat and with a Two Needle Tool pierce along the line. If you have a GRID then you can use this to pierce through (it does help space the holes evenly)
Use Parchment Scissors to cut the parchment. Place Scissors into two holes, twist scissors slightly towards you and then cut...you will hear the snip. continue this until all holes are cut. (Note scissors are pointing away from corner). When cutting for the double line first cut as for the single line then turn work around and cut facing the corner.


 Emboss Snowflake on back of Parchment. Turn over and once again Pierce with a Two Needle Tool on a Piercing Mat.
 Use Parchment Scissors to cut between the holes as before. Then slip in your backing paper.
 These next corners can be used with TWO pieces of Parchment, One for your main image and the other would be your backing sheet.

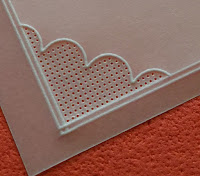
 Using the Border Groovi Plate Emboss the Scallop as before. Turn over and fix to Grid. The one I use is a 2 in 4 (I can use a 2 needle or a 4 needle tool) Use a two needle to pierce the holes. If you do not have a grid then you can colour or emboss another design into the corner before you go on to piercing and cutting.
 Once again using the Two Needle Tool, pierce along the Scallop as in photo then cut along with Parchment Scissors.
Once you have finished and slipped in your backing sheet, you can then use a bit of glue or tape to attach your design to a Card Blank without them showing through.
I hope that these may be of help to you


SNOWFLAKE CORNER
 Emboss Snowflake on back of Parchment. Turn over and once again Pierce with a Two Needle Tool on a Piercing Mat.
 Use Parchment Scissors to cut between the holes as before. Then slip in your backing paper.
SCALLOPED CORNERS
 These next corners can be used with TWO pieces of Parchment, One for your main image and the other would be your backing sheet.
Using Groovi Border Plate emboss the scallop (you can emboss it the other way round too) Turn over and as before Pierce on a mat then cut with Parchment Scissors. Take note of the positioning of the scissors. (this is solely to get your 'points' in the right direction). You can colour the center of the scallop or leave it plain.
PIERCED SCALLOPED CORNER

 Using the Border Groovi Plate Emboss the Scallop as before. Turn over and fix to Grid. The one I use is a 2 in 4 (I can use a 2 needle or a 4 needle tool) Use a two needle to pierce the holes. If you do not have a grid then you can colour or emboss another design into the corner before you go on to piercing and cutting.
 Once again using the Two Needle Tool, pierce along the Scallop as in photo then cut along with Parchment Scissors.
Once you have finished and slipped in your backing sheet, you can then use a bit of glue or tape to attach your design to a Card Blank without them showing through.
I hope that these may be of help to you
Happy Crafting
Hugs
Emma xx


No comments:
Post a Comment