Thank you to all who read my Blog and leave a comment. I really do appreciate every one of them and do my utmost to reply as soon as possible.
Crafty hugs to all!


Sunday, 1 March 2015

Clarity Stamp Challenge 25: Anything But A Card

Design Team Sample for March
Anything But A Card!

Hi Folks! 1st March today.  Time for another Claritystamp Challenge.
This month the topic is Anything But a Card
As long as any stamping is done by using Clarity Stamps Only.

For my design piece I decided to share a project that I have made for myself.

I am going on a hike up Ben Nevis at the end of May and I know I am going to be surrounded by some breathtaking scenery and I would quite like to capture some of it on paper!

So I have made myself an A4 Art Travelling Book...What is that you ask?...

Well let me explain!
(Lots of pictures in this post!!!)

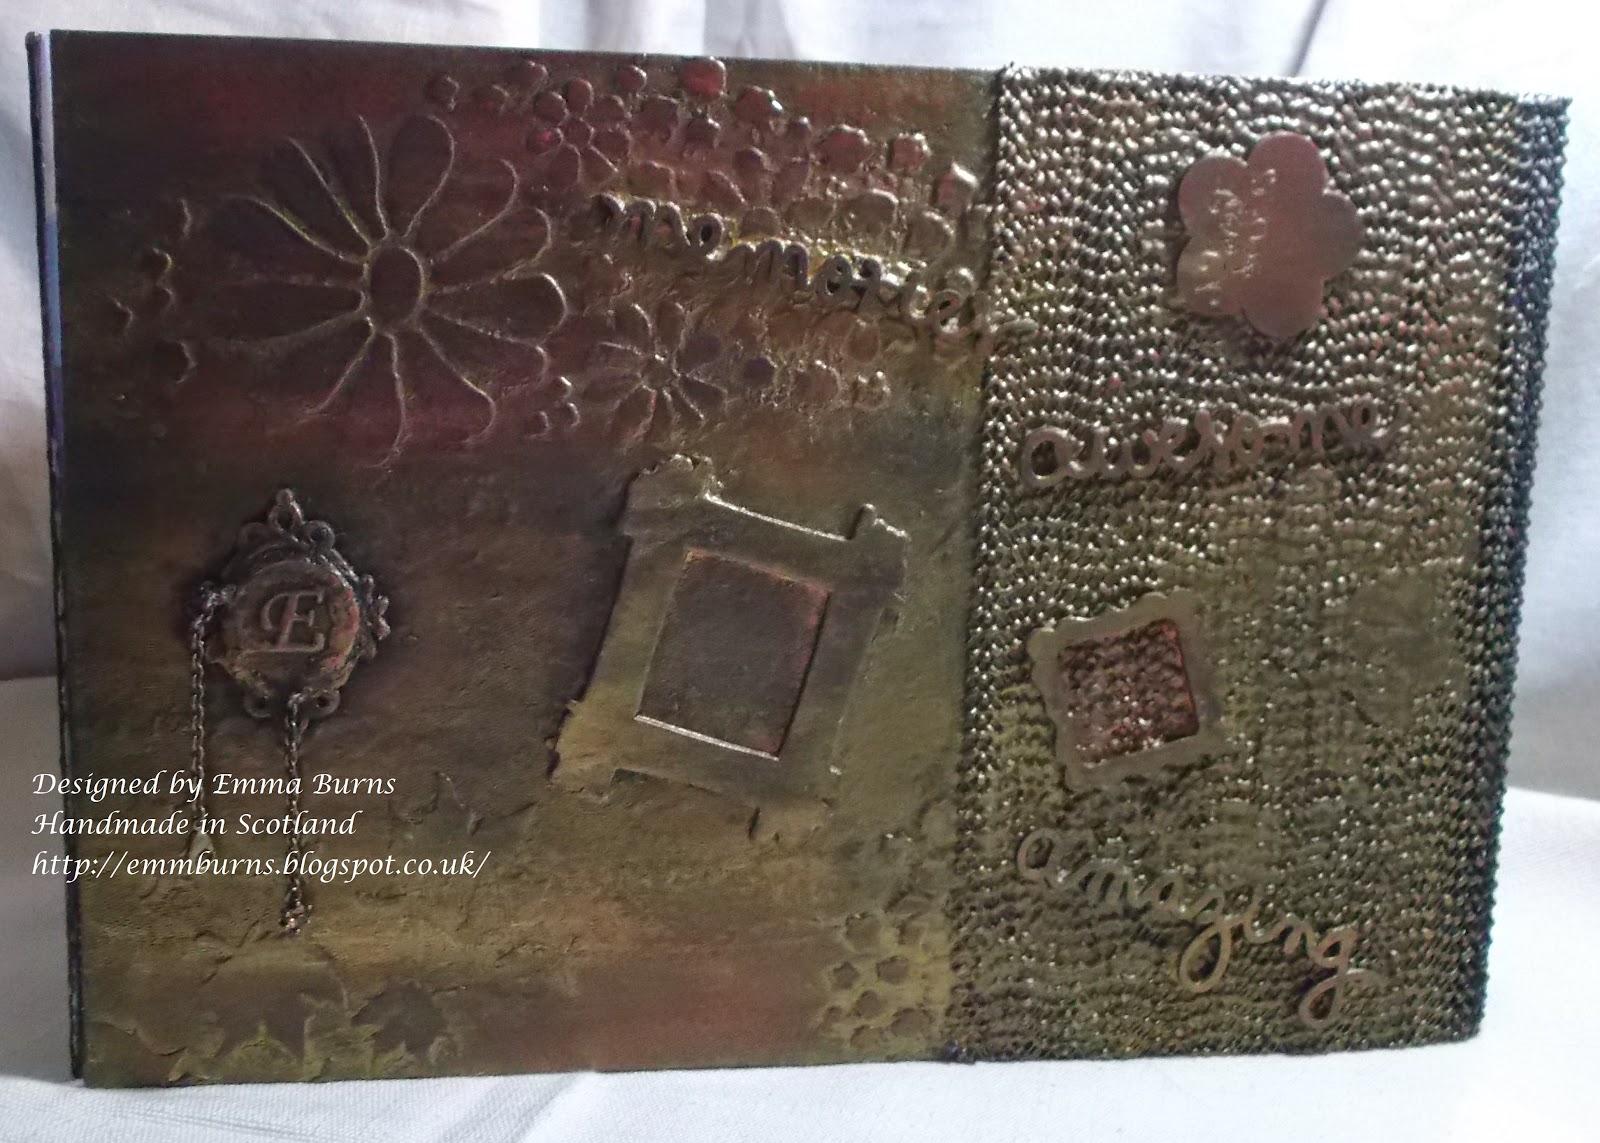
It has 3 hard outer Covers
Which I have decorated with Grunge Paste,  Acrylic Paint, Gilding Wax
Stamping, Stencilling
and  a few other bits n bobs


Why 3 Covers?

Well I needed a back to my book and I needed a front for my book
Which I have attached together using a Zutter Binder and Owire

What's the third one for?
(dragging this out)

Well the third Cover is to hold the things I will need to take with me when I go Up North!
Which I put together using a very practical bit of kit from my crafty stash!

Want to see?
After putting two of the boards through the Zutter Binder then the Inner Pages to create the holes required for binding later, I began to decorate.

Back Cover and Top Cover (Upside Down)
I have stencilled Grunge Paste directly onto the Boards.  But before I did that I attached a piece of NON-SLIP MATTING using BOOKBINDING GLUE.  When dry I then applied GRUNGE PASTE over the top.  I left a gap between the Boards so that I had a wide enough flexible HINGE.   I thought it was quite ingenious myself.  The MATTING only cost £2.00 and it is huge so I can use it for a lot more things, like stopping my pencils and pens from rolling off my work desk!

Want to see the Inside?

I think we should continue with the Outer Covers!
But before that a picture of SOME of the items I used to make the book

9 x 11 TRELLIS, 9 x 11 LEAFY SWIRL, 7 x 7 FLOWER POWER, 7 x 7 MAPLE LEAVES, GRUNGE PASTE, SYSTEM 3 ACRYLICS, ARCHIVAL INK, SPREADER, ADIRONDACK INKS are just some of the items used sourced from CLARITYSTAMP

Other items used were sourced from Drawright in Ayr and The Works

Top Cover


I'm  pleased with the CHAINMAIL effect of the Matting mixed with Grunge Paste and Acrylics.

For this I used the Maple Leaf and the Flower Power Stencils and Grunge Paste.  I then added a few layers of Acrylic paint - Gold, Bronze, Blue, Green and Black ( I wiped most of the Black off before it had dried)  I attached a selection of wooden frames, words and shapes (The Works). I added more Black Paint, wiped more off and then set to with my GILDING WAX - Golden Light, Deep Red Then buffed it all up using some kitchen roll.


I like to add a CLASP to close the books I make and I do this by finding a bit of old Jewellery (Charity Shop) that I can alter or simply take apart.  I measured to make sure the chain would reach the OWIRE ok and that I had enough to leave a bit hanging.  The rest of the chain is hidden behind my Initial (a Metal disk from an Alphabet Set - Drawright) As the Wooden Frame had a recess, I simply placed the excess chain into it and added some Grunge Paste - not too much, just enough to make it set the chain in place.  I left this to dry and added more Grunge Paste then placed my copper disk on top and ...Squished!  I used a small glue spreader to remove some of the excess and flatten the rest.  Once Dry I had to add more of the Acrylic paint and Gilding Wax.

NEXT!


Middle Cover


I have used the same treatment as the top.  Using the TRELLIS STENCIL along with the LEAFY SWIRL stamp (Cobalt Archival Ink).  I applied the stamp before I added BLACK ACRYLIC.  I used MOD PODGE to attach  a couple of Die Cut Swirls (made from the inner foil lid of a coffee can) and a Sizzix Strip Die.  This is where the Sharpie Bronze and Gold Pens came in handy to colour the Foil. More Black Acrylic, more wet wipes...definitely cuppa time now.  I had a bit of bother getting the colour to stay on the foil until I used a Sharpie pen, I was then able to add more colour with the acrylics and waxes.  (if I had sanded the foil a little bit I wouldn't have had any bother).

Back Cover


Same treatment with the LEAFY SWIRL and MAPLE LEAVES stencils with Grunge Paste, Acrylic Paint, Gilding Waxes.  I thought at first I had gone too far with the red wax at the top but I am liking it now.

So now we get to the inside (yup there's more!)

 Middle Cover and the Back Cover before binding.

I cut down a couple of 12 x 12 papers, put them through the binder to make the holes and used MOD PODGE to attach to the Boards. I used a scraper working from the middle outwards to smooth it all out.  I didn't do anything else to the Back Cover but I did add a little artwork to the Middle and Top Covers.

Inside Middle Cover

I created a mountainous landscape using a CLARITY STENCIL BRUSH, Makeup Sponge, my own Mountain Stencil (made from thick acetate) and Adirondack - Eggplant, Black, Pesto and Butterscotch Inks to create the brooding hills and skyline. I used Dovecraft - White Pigment Ink to create the snow capped mountain.  I added two lonely trees SMALL LARCH and PINE TREE  (I have added the link for the Pine Tree from the Scotland Set but the one I used here was from the mini collections - ATC Stamps).


Inside Top Cover
For this I used a Layer of CRAFT FOAM. 
(paper would have just shown where the elastic is fixed) 

I have stamped the LARGE and SMALL LEAFY SWIRL in Archival - Cobalt.  I attached two pieces of 2cm Elastic to the corners of the bare board. I then attached 1cm thick Elastic Strips through the FOAM and then coated the Board with BOOKBINDING GLUE and attached the FOAM and left to set. I then made a little Clear Plastic Pouch (salvaged from a bag)and attached to the board with Red Double Sided Tape.
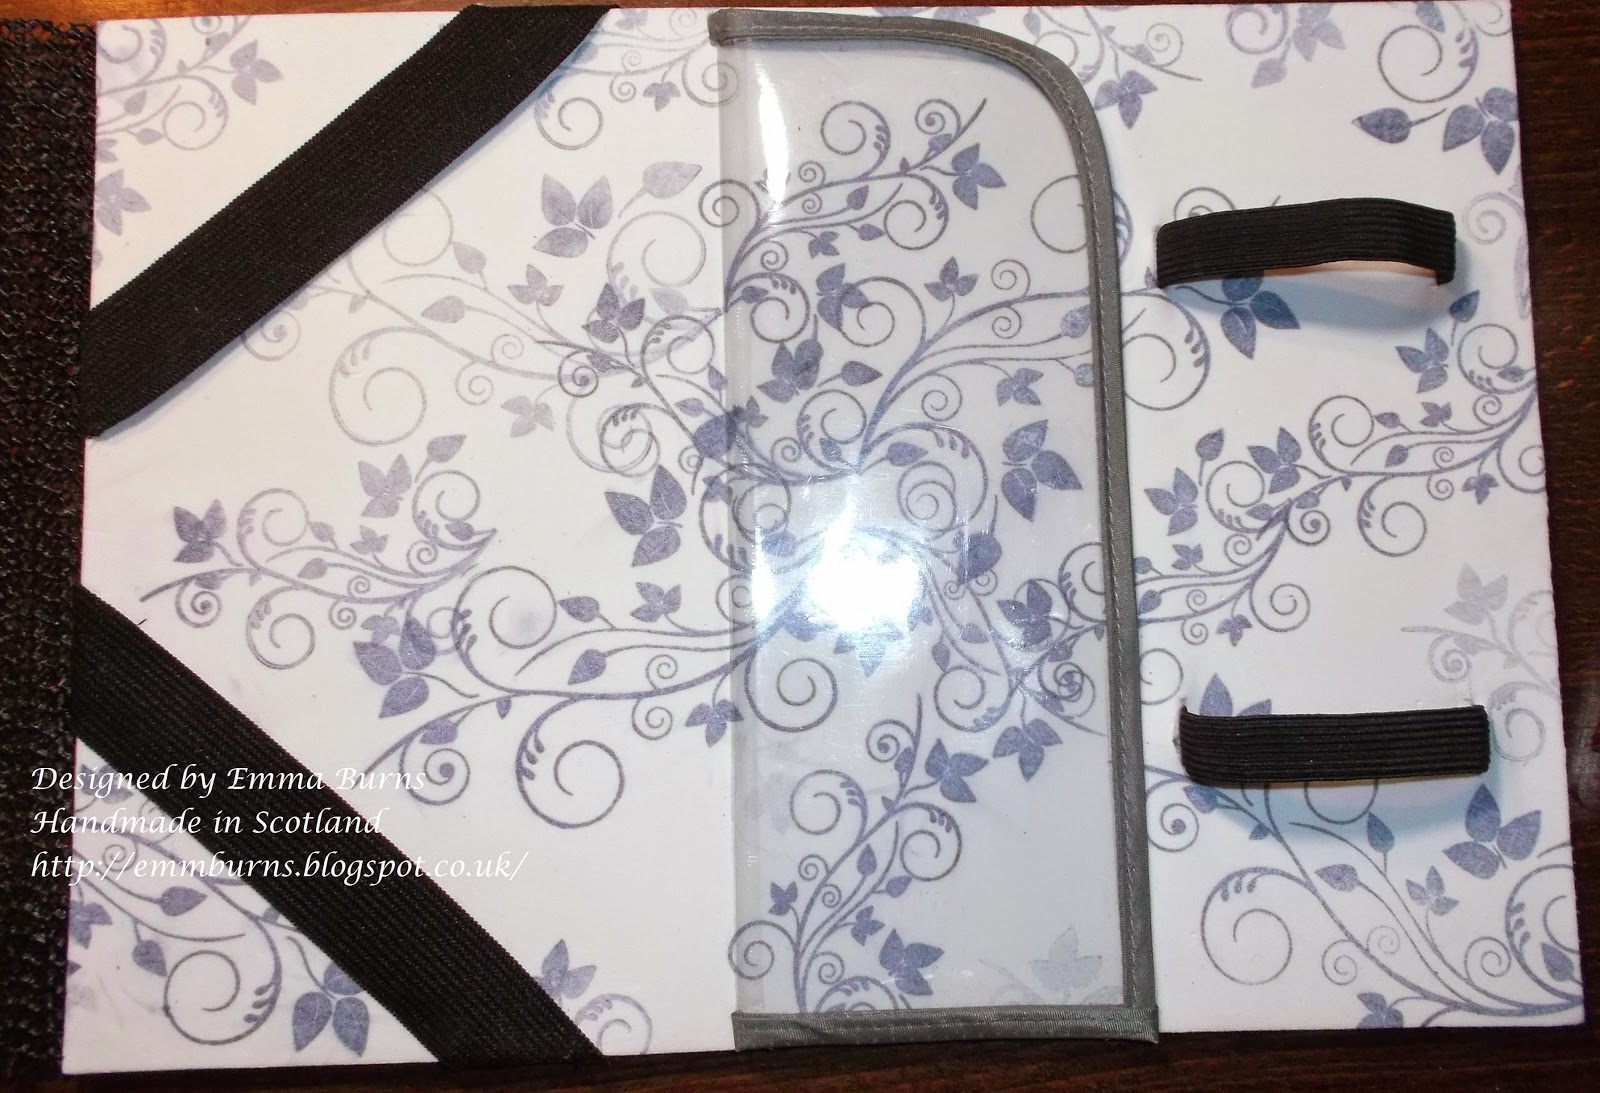

This way I can take with me Water colouring Pencils, brushes and also Chalk, Graphite, Charcoal, Drawing Pencils, rubber, Pencil Sharpener in the other tin.  I can also interchange what kind of pencils or Pens to take with me, or even a small tin of paints.  I am quite pleased with the options that I have given myself...it will probably take me longer to decide what I take in this than what I take in my rucksack!


Once all the Covers were decorated I put my mix of different types of paper along with the boards and Owire through the Zutter Binder  to finish.

There you have it, one Art Travelling Book just for me!

Just a few more pics...I promise


My favourite bit
and there is one more!!!

I also managed to get a couple of background sheets to use at a later date.


These were simply made by taping a bit paper OVER the stencil and brushing all the excess acrylic paint from my brush as I went along.

Phew! I do hope you have managed to stay with me till the end!
Let me know what you think!

Happy Crafting!!

And to those of you out there entering the Claritystamp Challenge
(£50.00 Clarity Stamp Voucher to the Winner chosen at Random)

I wish you all the best of luck xx

Hope to see all your lovely artwork on the Blog


P.S.  I just wanted to add that One of  the bare Covers was taken from a set of blanks I got at a craft show  (everything is a pound stall)  It is the ones that just have the two holes punched already, best bit is that  they come with A4 paper and the two metal rings...bargain.  I hid the holes with the grunge paste. You do NOT have to have a Binding Machine to make a book.

Saturday, 14 February 2015

Valentine Heart XX

Hi Folks!  Hope you are all having a lovely Valentines Day.  For those of you who do not have anyone to share this day with, then here is a card for You!

 Hope you like it!

If you would like to see how I made it then please read on...

Sunday, 1 February 2015

Clarity Stamp Challenge 24: Flowers

Design Team Sample For February

Hi Folks!  Well we are now in February and most people have had quite a heavy snowfall so  hope you are all coping with it.  We here in Tarbolton only got a few millimeters of snow and it only lasted a day, so my son and I had to go on a walking trip just to get some winter photos.
  
So I am here today to share with you my Sample for this month's challenge which is all about FLOWERS
This card is designed using my most favourite crafting things.  Parchment, Grunge Paste,Clarity Stamps and a Clarity Stamp Stencil. I have used two Clarity Stamps for this design, one being the small Leafy Swirl and the other being a small bunch of Flowers from the Remountable Garden Set. The Stencil is from the New Design Stencil Club from Clarity Stamp.

Right lets get to it!


7 X 7 Gelli Card, Grunge Paste, Clarity Stencil. Post it note mask x 2.  Apply Paste to card.  Once paste is dry place first mask over lady.  Reverse stencil, tape securely in place and apply paste. Remove Mask and using a damp brush (if you wish) smooth out the paste on the face and upper body and arms, you can also put detail into the hair.  I should point out that when using grunge paste it is best to tape your card to a solid surface not just copy paper, that way when you scrape the paste over the stencil you have more control and less movement.


Once dry cover with masks and tape them together (as in picture below). Stamp in background. In this case the Small Leafy Swirl (Clarity Stamps are that deep that you can stamp right up to the edge of the Grunge Paste).  You can either stamp in Versamark, add Embossing Powder and Heat Set as I did, or you can just simply stamp in ink.  I had added a raspberry ink and roughly wiped most of it off the stamp.  The Versamark re-wet the ink so that it shows up here and there.  I did this to go with one of the ribbons, it has shiny pink and silver stripes through it.


Use Masks as a template for dresses on Parchment. Lightly Trace outline in White Pergamano Pen.  Lightly Emboss on Back. Stamp out floral bunch onto copy paper, Trace within outline of the dresses using Pergamano Pen. Lightly Emboss on back of Parchment. Add shading to dresses with Hockey Tool. Highlight on the Front with Tinta Pearl and mapping pen. Use a Fine ball tool to put creases and folds into design. Cut out dresses as one piece and attach to Grunge Paste with Perga Glue.


Now to the Embellishments.  You can use ready made flowers or you can make your own using Dies..I used several Sizzix Floral Dies and Leaves.  I cut them out on White Coated Paper. Painted them with Tinta Pearl and left to dry.  I shaped them before putting them into my Melt Pot.  Big Tip...use a crocodile clip to hold things with ( I had been using one but it had rolled off my work table.  Result...I have injured my left hand...my fingers actually. Blisters! My own fault! I had over-glazed one of the roses I had made and I completely forgot how HOT it gets and just dove right in!) Yup I can hear you...that was a daft thing to do...I totally agree!!


I used Two thicknesses of Strong double sided tape to attach the design to the backing papers a Silver Pearl and a glittery daisy patterned Vellum and then to the Blank 8 x8 card.  I added small pearls to the corners for a bit of bling!  I used my Pergamano Pen to write out the Sentiment and  went over it with the Tinta Pearl using the Mapping Pen.  I embossed the edges and added Tinta Pearl.  Cut it out and attached with Perga Glue to the Floral arrangement. I attached two ribbons together with double sided tape, added them to the card.  Added the floral arrangement - I used a silicon glue for this. I also added a bit of string pearls to the mix.

You can see on the heads that I have  given some details to them and the hair. 


Close up of the dresses


Close up of the Floral Arrangement


So there you have it!  I'm not sure what I like most myself about the card, the way the parchment dresses worked out or the way the white paper flowers and leaves now have a lovely creamy sheen to them which also shows up the veining.  I hope you like it too.  If you give the techniques a go please let me see what you create, I would love to see what you do. xx

Notes:  When using Grunge Paste have some soapy water handy for washing stencil and scraper.
            Use a Tumble Dryer sheet to smooch over parchment to help tools glide rather than scratch.
            Protect your work surface with a heat mat or a hot glue mat.
            When using Melt Pot....use crocodile clips and have a cup of cold water handy...just in case!

So come on give this month's challenge a go.  There is £50 Clarity Gift Voucher for the winner (picked by Random. Org) and for the Top 5 (chosen by the Design Team) there is a chance to have your work showcased.

  The Competition is open to EVERYONE. 
ALL Stamping / Stencilling must be with Clarity Stamps and Stencils 
If you do not have a Blog then entries can be by email.
Check out the current Challenge #24

And as they say

You Have Got To Be In It To Win It!

Happy Crafting Everyone

Emma xx

Monday, 12 January 2015

Grungy Heart!

Hi Folks!  Wet and very cold here in Ayrshire but it is good crafting weather!  I have been having a second play with a new Heart Stencil.  I used the inner bit on the book cover that I showed you in my last post about the Art Journal  The stencil is from Clarity Stamp and it is this months FREE stencil which arrived along with the new FREE stamp of the month.  I am part of the New Design Club at Clarity Stamp.  I am a GOLD member which means that I get a stamp and a stencil every month.
Along with the Stencil I have once again thrown in grunge boards, grunge paste and acrylic paint.   This is what I made.
I have to say at the start that if you plan on doing this then you will NEED a goodly amount of Wet Wipes, Kitchen Roll, warm Soapy Water (for cleaning your stencils, scraper, palette knife and paint brushes).  Use either a craft sheet or a glass cutting mat (I ended up using both).
Can I also say that this post might seem to jump about a bit but there was a lot of waiting around for things to dry so I have actually written this in the order that I did things.

So I began by taking 4 small boards, taped together (temporary) turned over and painted with White Acrylic.  Added a Flourish. Painted more Acrylic over the flourish. Left to dry.


Tape Heart Stencil over boards, add Grunge Paste, remove stencil, Leave to dry.  Place Inner part of Stencil over the Heart, add more Grunge Paste, Take Craft Knife through the paste to separate the squares. Leave to dry.


Lay down some Underskirt Netting then Paint Red Acrylic over Squares. Leave to dry.  Add a layer of Black Acrylic but before it completely dries, wipe a lot OFF with a wet wipe then leave to dry. You can then get on with painting any embellishments

I used a small butterfly die cut and some leaves from my stash.  Painted them Red, then Black repeating what I did above.  Then I did a bit of Brushing with Gold Mica powder.  So my Butterfly ended up looking like this!  Let everything dry.
Now at this point I would like to say that this project was inspired by a piece that  Maria Simms did using this technique.   I Would also like to say that I have altered it a bit, why?  Because Maria Used Gold Acrylic paint and I had none!!! So I had to improvise.  When I took the wet wipe to the Black Acrylic it made it a bit more tacky so that is when I added the Mica powder.  I used Perfect Pearls Mica Powder as it does have its own adhesive quality.
For Framing the boards I took a piece of Printable Canvas and once again repeated the Process with the paint and Mica Powder.  Once dry I cut it into an 8 x 8 square, attached it to a sheet of Patterned paper, cut this into 9.5 x 9.5 square.  I decided that the paper was a bit too pink so I used a Stencil Brush and Archival - Coffee to give it a better shade.  I then attached this to a 10 x 10 Canvas Board which I had cut to size and painted with Black Acrylic.


 I quite liked the boards before I added the Mica Powder.


I added the leaves and butterfly using a silicone glue.  By this time all the natural daylight had gone and my lighting is terrible. There is a lot more shimmer to it than I wanted but it has turned out well. It is also not so dark...must take lessons in photography!!

The piece is now in the hands of its new owner, so I am a very happy crafter!

If you have a go at this design, drop me a note and a picture and I will share it for you.

Happy Crafting!

p.s. Now I will go and have a play with the new stamp!