Thank you to all who read my Blog and leave a comment. I really do appreciate every one of them and do my utmost to reply as soon as possible.
Crafty hugs to all!


Showing posts with label Adirondack Ink. Show all posts

Friday, 1 April 2016

April Challenge

Hi Folks!  I hope you are all well and ready for the next Claritystamp Challenge!
This month's theme is 

MASKING!

My Design Sample for this challenge


Now this piece started out a little bit different from the finished result as you will see from the pictures that follow.  
As I mentioned, the theme is MASKING and I certainly did a bit of that!  I made use of a Clarity Square Stencil for centering my image and I used the innie part of it to cover the central area.  I used the Mask of the Large Postage Stamp underneath to keep this area clear as I had an idea rolling about in my head!
I coloured the outer background of my piece using Adirondack Ink: Caramel and  Cranberry. Applying the inks to the card with a couple of Smoothies, dabbing and rolling, overlapping and using the ink till it was no more!!.  I then spritzed  water onto my fingers and let it drip onto my work, left it for a few seconds and dabbed it dry with a clean kitchen roll.
I then replaced the Square Stencil and using the Caramel Ink I shaded in between the stencil and Stamp Mask.  After removing the Stamp Mask I stamped the owl (Black Archival) into the center and MASKED him (I love that Barbara had Masks made for her stamps) so that I could create a background for my owl. (more caramel and Torn Copy Paper for hills along with Low Tack Masking Tape to protect the outer background)

My owl was coloured using a selection of reds and orangey brown Spectrum Noir Pencils and I finished him off with a Henna ProMarker over his head, wings and body.  A quick polish with kitchen roll and he comes up a treat!  Just  pity the light was too bad to show the shine.

Now at this point I had definitely decided that I had taken a wrong turn with the colour choice for the center frame.  I originally wanted the card to look as though I had framed a stamp of an owl and then mount the piece on a canvas.  But it just wasn't working out for me!  But ever the resourceful crafter, I changed the central frame with the help of a black fineliner, ruler and a Black Sharpie!  


Then of course the central background was too pale for me so I had to play around with that. Low Tack Masking Tape around the center frame, a few Leaves and some foliage, more green (Pesto Adirondack) to the hills and of course blue to the sky. (Stonewashed Adirondack)  I used a damp paint brush to pick up some green ink from ink pad to colour the foliage.  Out came the black Sharpie and Ruler to add a Line around the whole piece.  Then using Strong Double Sided Tape I attached it to an 8 x 8 Card Blank.

Much happier with this!
So now it is up to you to get your thinking caps on and your MASKING Techniques on the go.
As usual you will find the RULES of the Challenge on the Claritystamp Challenge Website (they are very simple).  I look forward to seeing all your lovely creations and wish all who take part the very best of luck.
Happy Crafting!

Hugs
Emma x

All Stamps, Stencils and Masks used to make this card can be sourced from Claritystamp Ltd

To enter the Clarity Challenge, to see the Rules and of course to see the wonderful samples from the rest of the ladies on the design team click here: CHALLENGE 38 Masking


Wednesday, 1 July 2015

Claritystamp Clallenge # 29

Hi Folks!  1st of the month!  JULY!!!!!!!  No it can't be!!!!!
Time is just moving too fast for me theses days!  How about for you?  
Well nothing to be done but fit as much crafting into a day that I can 
and this little number below was a quickie for me.

My Design Team Piece for 
Claritystamp Challenge
No 29
Anything Goes
(as long as its Clarity)

I taped up the edges of my Gelli Card (comes cut into lovely squares).  This was a job that called for Masking, so I stamped my deckchair, ball, bucket and the Banner onto Post-it Notes, stamped my images onto the Card and covered them with the masks.  (I already had Masks for the Beach Houses supplied by ClarityStamp, also a Moon Mask)
Torn Copier paper to make sand dunes, sea and sky.  My Claritystamp Stencil Brushes (of course) and inks used were Adirondack: Butterscotch, Stonewashed and Black Archival.

So with masks and copy paper in place I added the Sky using light strokes with my brush to build up the colour.  I then used the other bit of paper to cover the sky and then build up the sand dunes.
I stood back to look at the image and I wasn't quite happy with the sky so I went in with a make-up sponge and dabbed a bit of blue here and there.  I used my Stencil Brush on the Sun in a swirling action with the leftover Butterscotch....I felt the rest of the image was bright enough without me overdoing it with the Sun!!!
I used various Distress Markers to colour in my images (once I had removed the masks of course). Next I removed the masking tape from around the edges.  I took a Black Fineliner around the inner edge Twice.....I normally like to do a straight line but I felt this needed a bit of a squiggle.  I coloured all the little spaces with a Denim Distress Marker.  I then used an Indigo Blue ProMarker for around the edge and mounted this onto an 8 x 8 Card Blank.
I Die Cut two Tags, punched a small hole at one end, coloured them with Butterscotch Ink, threaded through a bit Butchers Twine and stamped the Top Tag with the "Lee" using the brilliant Letterbox Kit (that is what I used to stamp the Good Luck with).
All done and dusted apart from the message that will go inside.....Nah Nah!!!
So what happened!!!
Close up of border and bow
I took the pictures of the finished card...chose what I thought was the best one...sent it onto our wonderful leader Sazz...came on here today to finish writing my post....oh my silly me!!!!!
I had forgot to put in the ties that hold the Banner up!!!!
leaving it floating in mid-air!
Fine Liner in hand.  Got it sorted, took another picture, then sneakily went in and changed it!
(Hope no-one noticed)
So that is my piece for this challenge.  I hope you like it and forgive my blatant error....that's what happens when you try to do too much in a rush.

Please pop over to the Claritystamp Challenge Blog and have a peek at the WONDERFUL artwork created by the rest of the Design Team to give you some inspiration.  If you haven't had a go before, now is the perfect time with this theme...just get your Clarity Stash out and have a play.
But do remember to post your entry on the Blog or email a picture and your name into Sazzle at:

 ClarityStampChallenge@hotmail.com

We all look forward to seeing your lovely entries
and Congratulation the Winner of the £50 Gift Voucher
and our Top 5 Pick

Happy Crafting!

Hugs 
Emma x

Monday, 1 June 2015

Clarity Stamp Challenge 28

Hi Folks! Once again another month has flown by this year and it is now 1st of June...You all know what that means...Yes the start of another ClarityStamp Challenge over on the Blog  (last month's challenge 'Clocks' brought in some absolutely wonderful artwork....getting tougher each month for us on the Design Team to pick our Top 5 Favourites!!!)


This months Theme is: Boys, Boys, Boys!

For my Design Team Sample I have made a Triptych Birthday Card using some Clarity Boy stamps.

So in order to make this card I used the following:

Boys - Wee Folk 2
Mini Leaf
Mini Grasses 1
Archival - Potting Soil,
Adirondack - Stonewashed,
Memento - Summer Sky
Clarity Stencil Brush
Makeup sponge
Scissors
Post-it Notes
Double sided Foam Pads
Double sided Tape
Craft Knife
Brown Sharpie Pen


I stamped the Boy with his Dog first. As you can see this stamp comes within a frame. Made a mask of this stamp leaving just the edges exposed, inked it up with Archival Potting Soil, as I wanted to make frames for the other two ATC's.
  
I masked off the edges of all the Frames with Post-it Notes and then stamped the other images onto the ATC cards.  I stamped the boys first before masking two of them so that I could do some background and foreground stamping with the grasses and tree.
I had a right old mess going on...glad I had Nail Polish Remover to clean the stamps with!
After all this stamping I began shading the foreground with a makeup sponge and the Archival ink and a bit of torn copy paper.  Then using Memento Summer Sky across the middle of each card, also some Adirondack Stonewashed for the sky and a bit of water.  I applied the ink using my Clarity Stencil Brushes.
I removed the Post-it notes, marked the edges with a Brown Fine Line Sharpie Pen and added the tip of the Leaf stamp to the corner of each card for a finishing touch.  I trimmed the ATC's down to the edge of the Framing on all three.
I stamped the sentiment onto another ATC and used the excess ink on one of my brushes to colour the boxes.  This is a great little set from Clarity Stamp....very useful!  I cut out the boxes, mounted the 'Happy' directly onto the ATC  and mounted the 'Birthday' underneath directly onto the DL card with Foam Pads.
A little private sentiment for the insert later and there you have a finished card!

I hope this gives you a bit of inspiration to join in the challenge this month and I hope to see your wonderful artwork there!!  Remember there is a £50 gift voucher to spend at ClarityStamp up for grabs and a spot as guest designer for the winner too!!
To see the RULES and have a gander at what the other ladies on the Design Team have made, just follow the link below:

Happy Crafting and hope to see your wonderful entries soon.

Hugs,

Emma x

Sunday, 1 March 2015

Clarity Stamp Challenge 25: Anything But A Card

Design Team Sample for March
Anything But A Card!

Hi Folks! 1st March today.  Time for another Claritystamp Challenge.
This month the topic is Anything But a Card
As long as any stamping is done by using Clarity Stamps Only.

For my design piece I decided to share a project that I have made for myself.

I am going on a hike up Ben Nevis at the end of May and I know I am going to be surrounded by some breathtaking scenery and I would quite like to capture some of it on paper!

So I have made myself an A4 Art Travelling Book...What is that you ask?...

Well let me explain!
(Lots of pictures in this post!!!)

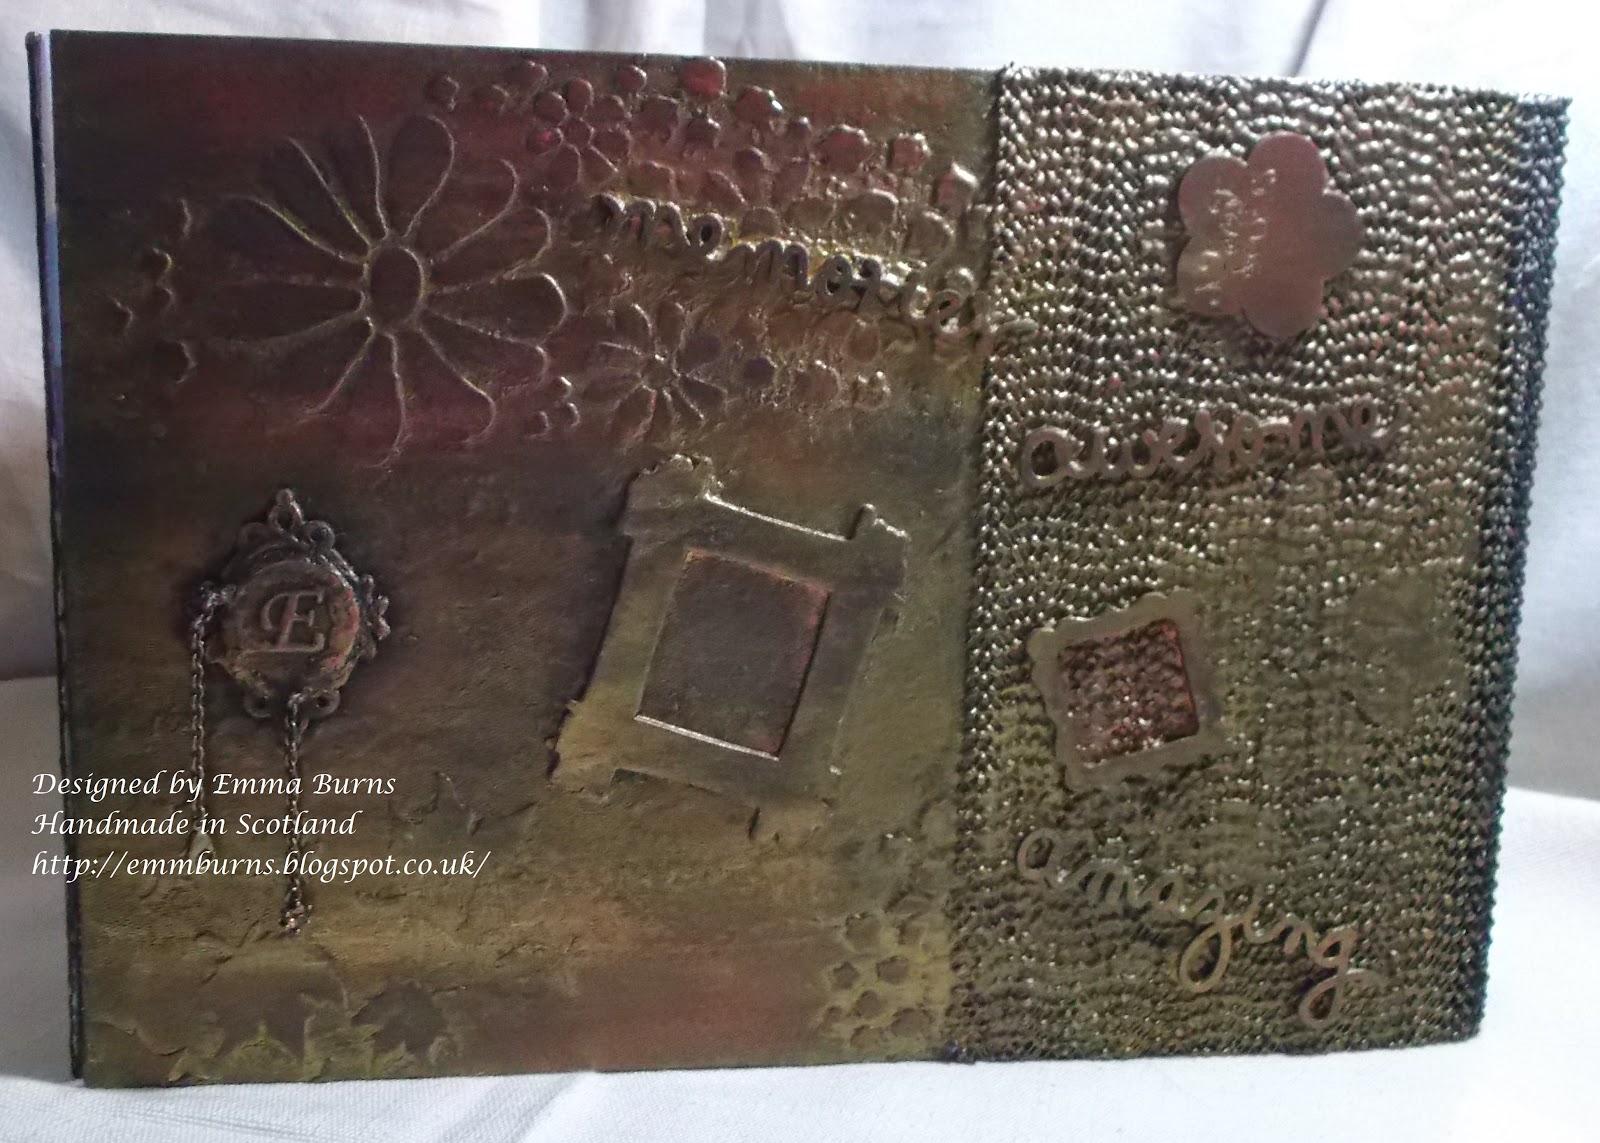
It has 3 hard outer Covers
Which I have decorated with Grunge Paste,  Acrylic Paint, Gilding Wax
Stamping, Stencilling
and  a few other bits n bobs


Why 3 Covers?

Well I needed a back to my book and I needed a front for my book
Which I have attached together using a Zutter Binder and Owire

What's the third one for?
(dragging this out)

Well the third Cover is to hold the things I will need to take with me when I go Up North!
Which I put together using a very practical bit of kit from my crafty stash!

Want to see?
After putting two of the boards through the Zutter Binder then the Inner Pages to create the holes required for binding later, I began to decorate.

Back Cover and Top Cover (Upside Down)
I have stencilled Grunge Paste directly onto the Boards.  But before I did that I attached a piece of NON-SLIP MATTING using BOOKBINDING GLUE.  When dry I then applied GRUNGE PASTE over the top.  I left a gap between the Boards so that I had a wide enough flexible HINGE.   I thought it was quite ingenious myself.  The MATTING only cost £2.00 and it is huge so I can use it for a lot more things, like stopping my pencils and pens from rolling off my work desk!

Want to see the Inside?

I think we should continue with the Outer Covers!
But before that a picture of SOME of the items I used to make the book


9 x 11 TRELLIS9 x 11 LEAFY SWIRL7 x 7 FLOWER POWER7 x 7 MAPLE LEAVES, GRUNGE PASTE, SYSTEM 3 ACRYLICS, ARCHIVAL INKSPREADERADIRONDACK INKS are just some of the items used sourced from CLARITYSTAMP

Other items used were sourced from Drawright in Ayr and The Works

Top Cover


I'm  pleased with the CHAINMAIL effect of the Matting mixed with Grunge Paste and Acrylics.

For this I used the Maple Leaf and the Flower Power Stencils and Grunge Paste.  I then added a few layers of Acrylic paint - Gold, Bronze, Blue, Green and Black ( I wiped most of the Black off before it had dried)  I attached a selection of wooden frames, words and shapes (The Works). I added more Black Paint, wiped more off and then set to with my GILDING WAX - Golden Light, Deep Red Then buffed it all up using some kitchen roll.


I like to add a CLASP to close the books I make and I do this by finding a bit of old Jewellery (Charity Shop) that I can alter or simply take apart.  I measured to make sure the chain would reach the OWIRE ok and that I had enough to leave a bit hanging.  The rest of the chain is hidden behind my Initial (a Metal disk from an Alphabet Set - Drawright) As the Wooden Frame had a recess, I simply placed the excess chain into it and added some Grunge Paste - not too much, just enough to make it set the chain in place.  I left this to dry and added more Grunge Paste then placed my copper disk on top and ...Squished!  I used a small glue spreader to remove some of the excess and flatten the rest.  Once Dry I had to add more of the Acrylic paint and Gilding Wax.

NEXT!


Middle Cover


I have used the same treatment as the top.  Using the TRELLIS STENCIL along with the LEAFY SWIRL stamp (Cobalt Archival Ink).  I applied the stamp before I added BLACK ACRYLIC.  I used MOD PODGE to attach  a couple of Die Cut Swirls (made from the inner foil lid of a coffee can) and a Sizzix Strip Die.  This is where the Sharpie Bronze and Gold Pens came in handy to colour the Foil. More Black Acrylic, more wet wipes...definitely cuppa time now.  I had a bit of bother getting the colour to stay on the foil until I used a Sharpie pen, I was then able to add more colour with the acrylics and waxes.  (if I had sanded the foil a little bit I wouldn't have had any bother).

Back Cover


Same treatment with the LEAFY SWIRL and MAPLE LEAVES stencils with Grunge Paste, Acrylic Paint, Gilding Waxes.  I thought at first I had gone too far with the red wax at the top but I am liking it now.

So now we get to the inside (yup there's more!)

 Middle Cover and the Back Cover before binding.

I cut down a couple of 12 x 12 papers, put them through the binder to make the holes and used MOD PODGE to attach to the Boards. I used a scraper working from the middle outwards to smooth it all out.  I didn't do anything else to the Back Cover but I did add a little artwork to the Middle and Top Covers.

Inside Middle Cover

I created a mountainous landscape using a CLARITY STENCIL BRUSH, Makeup Sponge, my own Mountain Stencil (made from thick acetate) and Adirondack - Eggplant, Black, Pesto and Butterscotch Inks to create the brooding hills and skyline. I used Dovecraft - White Pigment Ink to create the snow capped mountain.  I added two lonely trees SMALL LARCH and PINE TREE  (I have added the link for the Pine Tree from the Scotland Set but the one I used here was from the mini collections - ATC Stamps).


Inside Top Cover
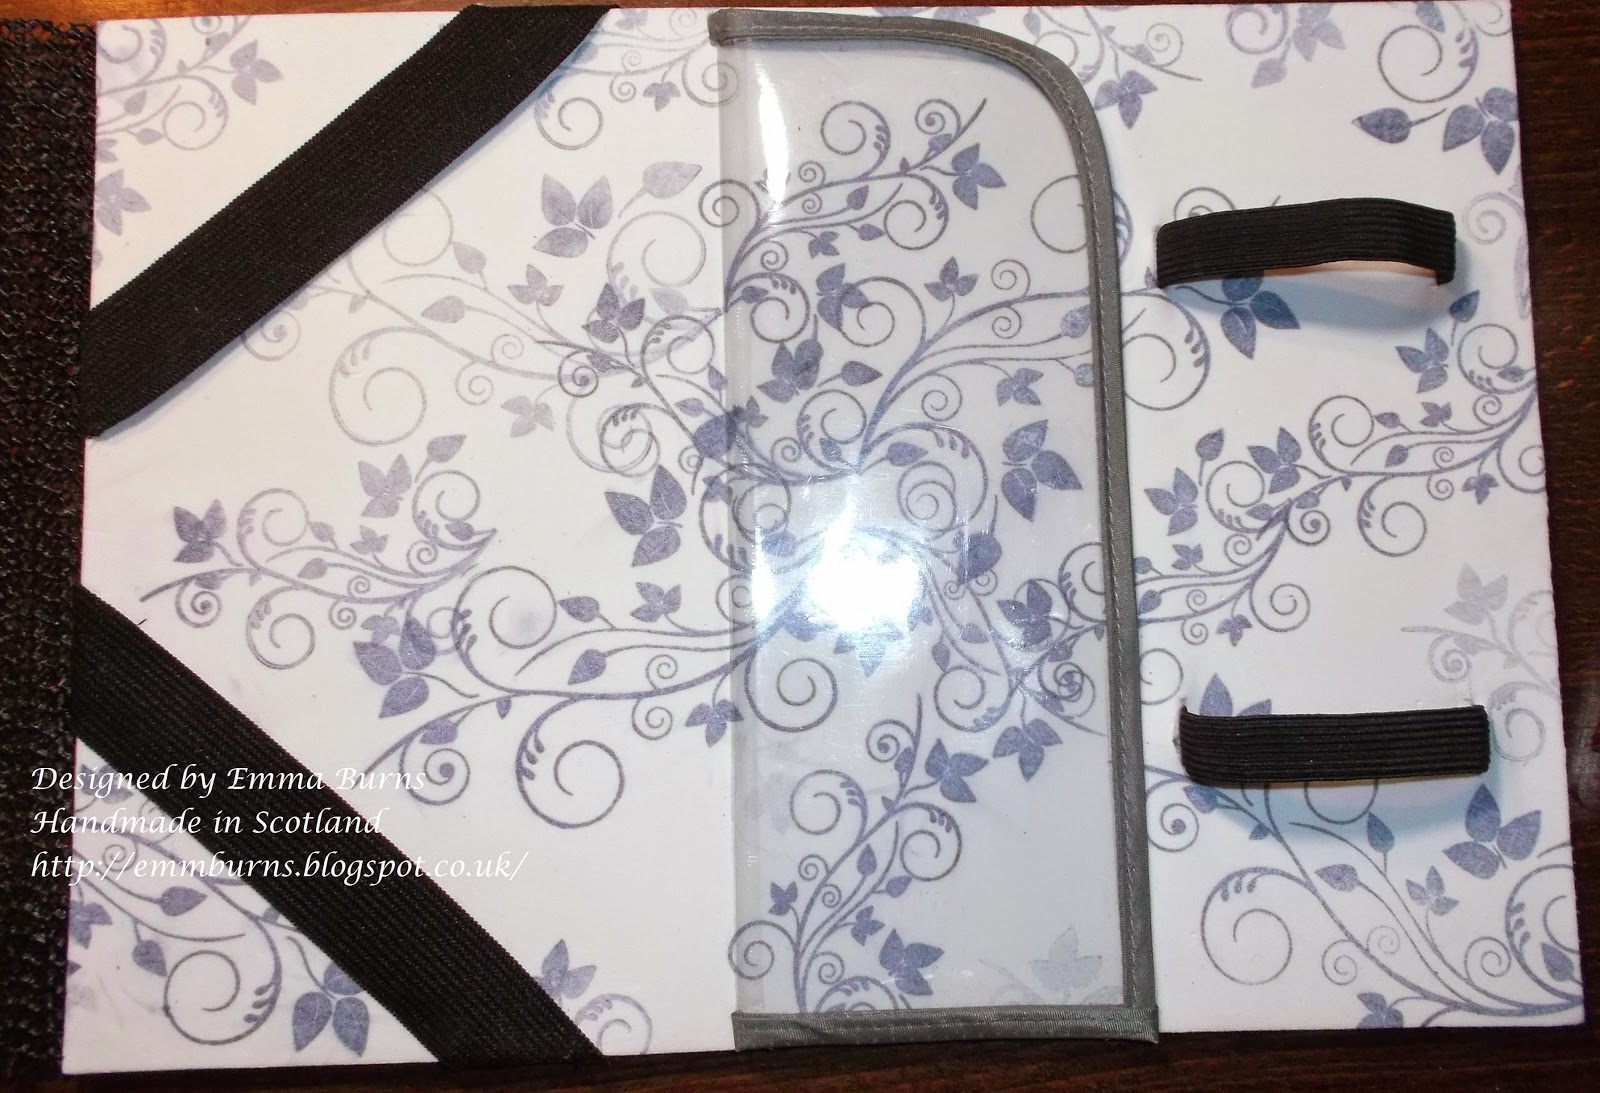
For this I used a Layer of CRAFT FOAM. 
(paper would have just shown where the elastic is fixed) 

I have stamped the LARGE and SMALL LEAFY SWIRL in Archival - Cobalt.  I attached two pieces of 2cm Elastic to the corners of the bare board. I then attached 1cm thick Elastic Strips through the FOAM and then coated the Board with BOOKBINDING GLUE and attached the FOAM and left to set. I then made a little Clear Plastic Pouch (salvaged from a bag)and attached to the board with Red Double Sided Tape.


This way I can take with me Water colouring Pencils, brushes and also Chalk, Graphite, Charcoal, Drawing Pencils, rubber, Pencil Sharpener in the other tin.  I can also interchange what kind of pencils or Pens to take with me, or even a small tin of paints.  I am quite pleased with the options that I have given myself...it will probably take me longer to decide what I take in this than what I take in my rucksack!


Once all the Covers were decorated I put my mix of different types of paper along with the boards and Owire through the Zutter Binder  to finish.

There you have it, one Art Travelling Book just for me!

Just a few more pics...I promise


My favourite bit
and there is one more!!!

I also managed to get a couple of background sheets to use at a later date.


These were simply made by taping a bit paper OVER the stencil and brushing all the excess acrylic paint from my brush as I went along.

Phew! I do hope you have managed to stay with me till the end!
Let me know what you think!

Happy Crafting!!

And to those of you out there entering the Claritystamp Challenge
(£50.00 Clarity Stamp Voucher to the Winner chosen at Random)

I wish you all the best of luck xx

Hope to see all your lovely artwork on the Blog


P.S.  I just wanted to add that One of  the bare Covers was taken from a set of blanks I got at a craft show  (everything is a pound stall)  It is the ones that just have the two holes punched already, best bit is that  they come with A4 paper and the two metal rings...bargain.  I hid the holes with the grunge paste. You do NOT have to have a Binding Machine to make a book.

Tuesday, 30 December 2014

Trees!!!

Hi Folks!  I hope that you all had a wonderful Christmas.  A quick post from me today (that's if blogger lets me, it has been freezing up on me for days).

This is a picture that I wanted to show you all but couldn't until now as it was a Christmas gift for someone.  With this piece I have used the Gelli Plate to make a reflection...so much easier using the Gelli Plate for this!

I used a sheet of Super smooth Card from Clarity Stamp (for use with the large Gelli Plate).  It is brilliant for stamping and shading.

I stamped my Trees and the Deer onto the Gelli Plate which I had mounted onto the Clarity Mega Mount (fabulous thing). I then used the Gelli Plate like a stamp and stamped onto my card.  I then turned my image around and then this time stamped my Trees and Deer directly onto the card.

I added some 'banking' along the waters edge using my mini Fern and one of the mini Leaves from a remountable set.

I covered the 'land' with copy paper and went to work on the water.  This was done using a Brayer, scrunched up copy paper, two shades of Memento Ink: Nautical Blue and Summer Sky.  The same colours were used with the Brayer (minus the copy paper) for the sky.   I used the Yellow ink from a Big n Juicy Pad - Soothing Sunset with a Stencil Brush. The deer are stamped in Adirondack Black, the Trees and Foliage are stamped in Memento - Olive Grove.  I drew in the small birds in flight with a Black Micron Pen.

I added more foliage to the top and bottom of the picture using Olive Grove again and then with a make-up sponge I added a bit more shading using Memento - Pistachio.


I decided at the last minute to add a bit more shading and foliage to the waters edge with the mini remountable leaf before framing.

All the products that I have used to create this picture, from the Stamps, Card, tools to ink have all been supplied by Clarity Stamp.  If anyone wishes details for anything I have used, leave a comment and I will forward you the details. I usually do a link for each product but as blogger is playing up and it has taken me nearly a week to get this posted I just wanted to keep going before it stalled on me again...apologies!

I hope you like it.  

I am entering this picture into the Clarity Stamp Challenge for December as the challenge is Trees.

Good luck to everyone in all their challenges and I hope that you all have a wonderful 2015.

Hugs to all

Emma xx