As you will know by now, I design Groovi Samples for Claritystamp Ltd. I love the Parchment Embossing Plates that they have produced. They really do make the art of Parchment Craft a lot easier to begin. But not only that, the Groovi Plates are not just for cardmaking. Aspects of the Designs on the Groovi Plates can be taken and mixed n matched with each other to create lots of different designs.
With that in mind, I used the Octagon Plate, Sprig Plate, Nested Squares Plate, Trellis Plate and the Line Borders Plate to Design and make this lovely little Gift Box. I then used the Tags Border Plate and the Sentiments Plate to make labels.
All of the Groovi Plates and the Starter Kit can be found by following the link to the Claritystamp Website. It will take you to the full list of plates on offer.

I began with 2 sheets of White A5, 140 gsm Parchment
 I used a Clarity Stencil Brush with Memento Teal Zeal to colour the Parchment. I used my 'Best Craft Mat Ever' as the parchment didn't slip around and it is brilliant for blending. Load up brush and simply swipe the colour over the parchment until you reach the depth of shade you require. This is now the BACK of your work.
 Rub Parchment all over with a Tumble Dryer Sheet (TDS) Attach Parchment to the Groovi Plate Mate (GPM) with tape at 4 corners.
Place the Nested Octagon Plate into the GPM and using No. 2 Stylus emboss the 9th (from center) Octagon. Change to the Sprig Plate and again emboss the design. Do not go over the outer line.
You are creating the Base of the Box. By embossing a design here it helps firm up the structure of the Box. You can colour your design or emboss it if you so wish.
 Attach Line Border Plate to GPM with tape.
Remove Parchment (still working on the back)
Arrange the two opposing corners (as in photo) along the SINGLE line on the Border Plate, then emboss with the No. 2 Stylus. Emboss the line out as far as you can.

This now gives you the height of your box. Turn Parchment around and REPEAT embossing on the 5th Line until you have 8 Rectangles radiating out from the Octagon
You can add decoration to the rectangles at this point...please see note below

Turn work over (front), trim along the outer edge of the Rectangles as in the picture on the Right.
Cut from the corner join on the RIGHT of each Rectangle to the outer edge. (cut on the White Line)
You now have a flap attached to the LEFT of the Rectangle. (as in Picture below)
PLEASE NOTE: At this point I went back to the Sprig Plate and continued the design up the sides of the box. You do not need to do this. I wanted the design to flow around the box so I needed to wait until I had cut away the flaps. I would advise anyone not confident or experienced enough Not to wait until the excess parchment is cut way to do this, as you may ruin your design.
 Attach a strip of Red Double Sided Tape as near to the white line then trim off the excess parchment as in picture.
Fold along all the white lines and crease ***
Remove Tape backing and firmly attach the flap putting it behind the edge of the rectangle and press into place.
You now have your Box Base.
TIP ***Crease the side panels so that you can see the white line from the side view.
Are you still with me?
Go get a cuppa....I'm going for one....be back soon !!!!
Well I definitely needed that. The box didn't seem to take so long when I was actually doing it and now there is the more intricate top to do....what have you let yourselves in for ........
Ready?

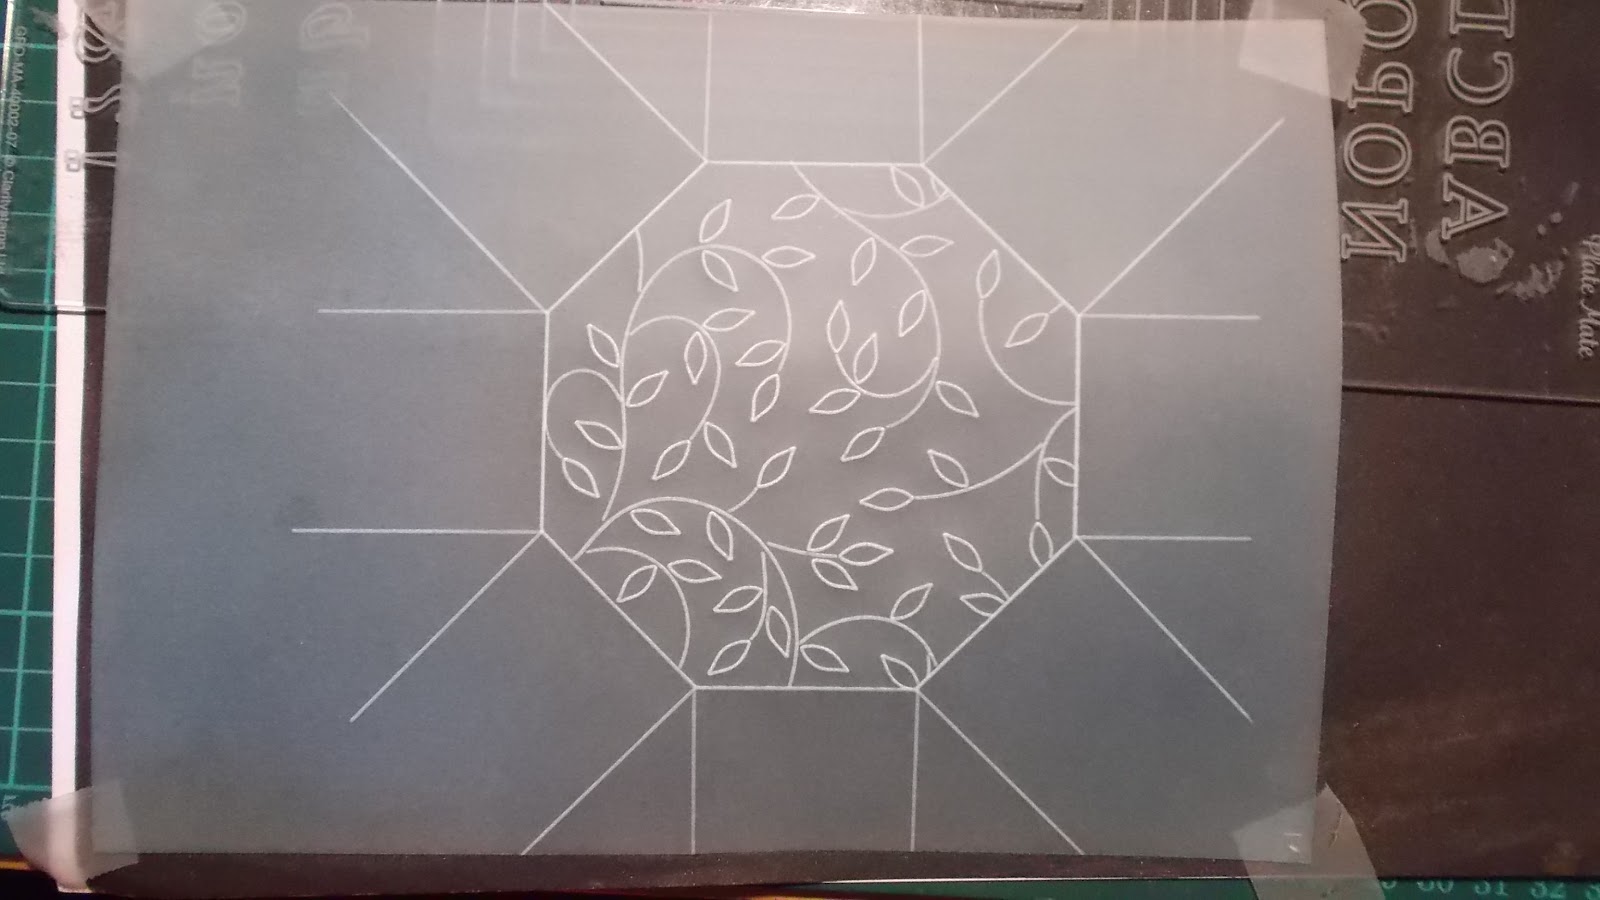
As you can see from the picture above, I have gone back to the GPM, Octagon Plate with 2nd piece of Parchment. I embossed the lines of the 8th and 9th Octagon. (don't forget to rub parchment with TDS) Changed Groovi Plate to the Sprig and PARTIALLY embossed some of the design within the inner octagon.
I then changed to the Trellis Plate and where I had embossed the Sprig and embossed the pattern of the Trellis making sure not to go through the lines of the Sprig.
Now I then lifted the GPM and placed the Sprig Plate on top of the Trellis Plate and laid the GPM back down on top with my parchment still attached. If you have Black Card underneath you can see both designs through the parchment. This enabled me to add more of the Sprig leaving out where the Trellis lines were. Removing the Sprig Plate and then just embossing the rest of the Trellis Plate with the result being the Sprig looking as though it was weaving through the Trellis.
I then used No. 4 and No. 3 stylus to do the whitework on the leaves.

I followed the instructions for making the Rectangles in the same manner as the Box Base only this time just using the Nested Squares Plate in place of the Line border Plate. I needed to score the line to complete the rectangle on the 3rd line from edge of Octagon as in the Picture.


I used a cocktail stick to apply some Pergamano Glue to the flap...only a small amount is needed.
I applied a little pressure for a moment before moving on to the next flap.
TIP****Crease the Side Panels so that you can see the white line from the top.

Now using scraps of Parchment. I embossed 3 tags from the Tag Border Plate all the same size. I pierced around them then added a little embellishment. The top one has To: on it with a little bit of sprig pattern, the middle has From: on it with a little bit of Sprig on it and the 3rd has my details handwritten on it. I cut them out with Parchment Scissors then they were tied to a Pale Blue Satin Ribbon and this was threaded through the trellis.
And just in case you forgot what you were making

Now you don't have to copy my exact design, it can be so easily changed with the amount of Groovi designs now available. The box can be made larger by using A4 or 8 x 8 Parchment. You can leave the sides blank or make the base a stronger colour for contrast....the list is endless it is now up to you and I would love to see you have a go at this. If you do, take a picture and send it to me (make sure you have your name on the front of the photo) and I will showcase your make for you!
Happy Crafting
I look forward to seeing what you all do
Hugs
Emma xx
No comments:
Post a Comment