Thank you to all who read my Blog and leave a comment. I really do appreciate every one of them and do my utmost to reply as soon as possible.
Crafty hugs to all!


Thursday, 4 September 2014

Lavender Dream

Hi Folks!  Still got the lurgy but determined to carry on regardless!  So today I thought I would share a lovely landscape stamp used with one of my favourite techniques...Embossing!

I have chosen the Large Landscape stamp from ClarityStamp Limited and my favourite Ink  (at the moment) Archival Brilliance Pearlescent Lavender.

The other items used in making this card are:
May all your Dreams Stamp (insert)                          Stencil Tape (or masking tape)             
Dream Stamp from Lesson 10                                  Stencil Brush (large)
Large Birch Leaf Stamp                                            Copy paper 
Bare Tree  Stamp                                          
Clear Embossing Powder                                          Ruler
Heat Gun                                                                  Wet wipes
Talcum Powder                                                         8 x 8 inch Blank Card    
Soft Brush for dusting                                                Moon Mask

I Taped off the 4 edges of the Blank Card, making sure that the Stencil Tape went slightly over the edge ( To protect it from getting discoloured when using the stencil brushes). I Sprinkled Talcum Powder onto card and brushed over lightly...tapped away excess.  (this stops the embossing powder from sticking where it shouldnt ).  Then I Inked up the Landscape Stamp, centered onto the card and stamped.  I Sprinkled the embossing powder on top and then tapped off excess and then heat set from underneath.


I added a moon mask and using a ruler tore some hills in some copy paper.  I lightly brushed they sky with the lavender ink.  I took the hills out to either side of the stamped image.  I tore anothe piece of copy paper but more of a straight line and used this piece to follow the lines for the horizon within the stamp.


 I put a bit more shading in on the outside of the image using my stencil brush and the torn copy paper. I then used the Large Birch Leaf stamp to stamp around the edge at the top and sides.  This gives the impression of looking through the trees. I then stamped the Bare Tree from a remountable winter set along the bottom of the image.


I then dusted once more with Talcum powder.  Stamped the word Dream and then embossed and heat set it

I stamped the sentiment onto the center of the insert and then I lightly stamped the Birch Leaf around the edges.  Once all the stamping was done I removed all the masking tape to leave a lovely white border.


Now I could have drawn a border all around the image either freehand or with a ruler but I decided just to leave it as it is. 

I hope you like it.  xx

P.S.  When using stamps and pearlescent ink it is best to give them a bit of a wipe as soon as you can. Intricate stamps can get a bit clogged up with this type of ink. With Clarity Stamps you can submerge in warm water or just give them a swipe over with a wet wipe.


Saturday, 30 August 2014

Roses and Grunge Paste

Hi Folks!  Hope you are all well out there in craft land!  I myself have had some type of lurgy this past month...just not shifting. So I have not been doing very much in my craft world.  I have been having a play with some old techniques ( thank you Barbara Gray for reminding me about them and also for the new take on one of them too).

So what am I rambling about?  Well it started recently when Barbara Gray  (on her daily blog) reminded us about the 'shaving foam' technique with liquid inks.  It had been such a long time since I had had a go at this that I of course had to nick hubbies shaving foam and have a play.  This came in handy as I had a couple of orders to fulfil...one a feminine card and the other was for a piece of wall art for a ladies bedroom.

So having had a play I set my bits aside and then went to read Barbara's Blog again and this time she was playing about with Grunge Paste, only she had added an extra little technique to using it...so I just had to have a go at that too.

This post will concentrate on the Grunge Paste Piece and I will blog the other bits n pieces later this week.
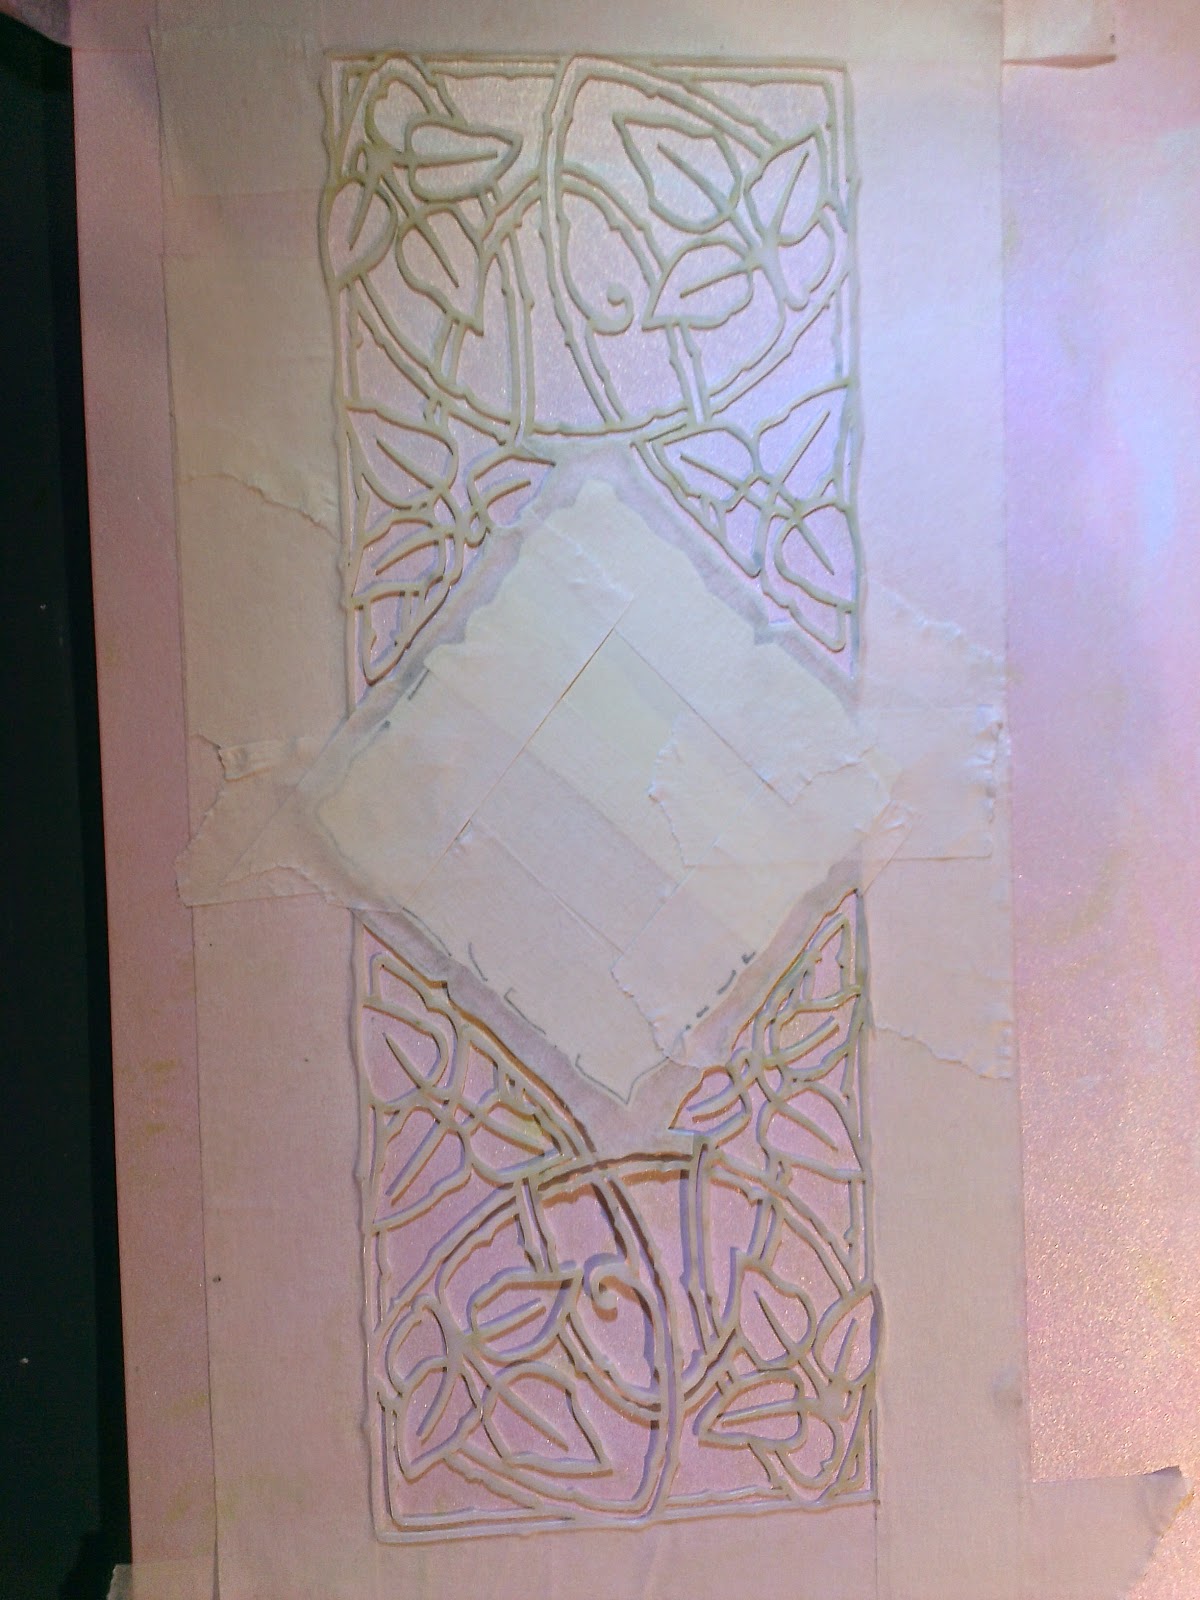
I chose a piece of marbled satin card from my shaving foam session.  Lovely shades of pink and pale green. I decided to use the Rose Panel Stencil from Clarity Stamp which has a lovely feminine Rennie Macintosh type feel to it.


I masked off the centre piece of my Rose Stencil and using a Stencil Brush, brushing Adirondack Pink Sherbet ink in from outside edges


I then covered this and the outer edges of the stencil too.
I then applied a layer of Grunge Paste to the exposed panels at either end of the stencil.

I removed the stencil at once to wash the paste off.


Once this was dry I re-masked the stencil adding masks to the leaves.  I then added colour to the Grunge paste using Distress inks - Bundled sage, Shabby Shutters and Adirondack - Pink Sherbet.

I removed the leaf masks and the stencil and dusted it all with talcum powder then replaced the stencil and once again masked up the edges and centre piece.


Once this was done I took a Versamark Ink Pad directly to the artwork over the stencil.  I then  poured some clear Thermographic Embossing Powder over it all.  I removed the stencil and masks  (checked to see for stray powder) and then I used my heat gun to set the powder.  I heated it from underneath to get a smooth finish.


What you get in the end is a ceramic finish to the Grunge Paste with a lovely shine to it.


I trimmed the artwork and mounted it onto Theuva Card which I shaded using Distress ink - Shabby Shutters ( a little bit of brayering thrown in ).  This was then mounted onto book cover board ( for the life of me I can't remember what it's called ) which I covered with Derwent Artist Watercolour Paper using Hi Tack Glue.  The piece now stands at 35 x 20 cm.

I really have to get my light box up and running to get better pictures.

So all that is left for me to do is to get to the DIY store, pick up some wood, get my router out and make a frame for it to sit in ( still unwell or would have had it done already ). Oh! And enter this into the Clarity Challenge for this month's feminine challenge before time runs out!!!

I hope you like it. And if you have never had a go at this it is much easier than I have made it look!  Have fun!

Hugs to all xx


Challenges:  http://claritystampchallenge.blogspot.co.uk/2014/08/challenge-18.html

Wednesday, 30 July 2014

Time for some crafting!

Hi Folks!  Yes I know I have been missing from Blogland for quite some time now.  I have simply been enjoying the summer weather and getting on with lots of odd jobs around the house and garden.  I haven't done very much crafting (I found that my books were clear for card orders - which is a first for me) but I did have a few projects to get along with on the days that it has been raining.

It has also been quite a time for us with our two cats and two tortoises...vet trips with the cats fighting (not each other) and a 3 hour dash to the other side of the country to get to a tortoise specialist to remove a microchip from one of our tortoises that had started to work itself loose...all pets doing well now.

I also treated myself to a new summer house ( that took a lot of painting ) and I am in the middle of making a very low coffee table to go in it.  (just waiting on some rope to arrive).

So now I have to get on and do some cards for Christmas and a few birthday cards too (that will keep me out of trouble for a bit)

For a long while now I have wanted to make myself a clock and I have finally got around to it.  I really needed to make one to go in the new summerhouse as I can sit in there all day and the next thing you know its 9 pm and I have missed lunch and dinner!

So here is my clock.  The inks I have used are all Archival and the Stamps that I have used are all from Claritystamp.co.uk

I started with a piece of wood (from an old drawer base) I cut it down to size and drilled a hole for the clock fixings.  I then gave it and undercoat of white paint.  I took my forest mask ( Clarity Stamp again ) and dabbed on some Fern Green ink.  I did 3 rows of this stencil. Next I took a Tree and stamped it in front of the stencil. Now I did this while the paint was still tacky for a reason...You can get the look of acrylic paints by doing this.  It adds a bit more dimension to your work, just remember to have a cleaner for your stamp handy so as not to transfer the paint onto the inkpad.  I started using this technique years ago when the kids were much younger as I didn't want acrylic paint in the house - not easy to clean up once dried!

I then stamped the tree from the winter wonderland set.  I used stamps from the Birdhouse set for the bottom and also for the foliage around the clock face.  I used the numbers from the number set.  I used Cornflower Blue and Cobalt for the sky, putting it on with a mixture of stencil brush and make-up sponge. To finish it off I took my Fern Green ink pad around the edges to give a border.  Now I just have to give it time to dry properly and I can get it hung up in place in my new summerhouse!

I forgot to mention the small fern and the grass stamp that I also used.


So all in all I am quite happy with my home made clock especially as it started out as an old drawer base!  I hope you like it too.

I have to get on now as I have a bag and a quiver to make but I will post soon with pictures of the reflection landscapes that I made while I was absent from Blogland.

Happy Crafting Everyone


Hugs

Emma x

Competition:  http://claritystampchallenge.blogspot.co.uk/2014/07/challenge-17.html

Friday, 30 May 2014

Words and Feather Background Card.

Hi Folks!  The card I am showing today is a very simple one, 3 stamps and two colours. All stamps are from Clarity Stamp.  The ink that I have used is Archival - Fern Green and Adirondack - Slate.

I began by masking up the edges of Cream Satin Card with Low Tack Tape, stamping the Verse - May God Guard... using the Archival ink and then dusting with Clear Embossing Powder and heat sealing it.


I took my two Large Matrix and Small Matrix Feather Stamps and stamped them using the Adirondack ink, doing a bit of secondary stamping with the small one.  I used a Clarity Stencil Brush and the Archival ink to brush around the outside edges leaving the centre plain.


I just love the detail that is in these Feather stamps

My next step was to layer up my image.  I did this using the Perfect Layers Rulers from Joanna Sheen. I used a lovely trellis patterned paper with different shades of green in it.  I attached my image then cut out the layer to the size I wanted and then I attached these to an 8 x 8 inch White Card Blank.


The end result has a delicate look to it which I am happy with.  I will be entering this card into the Clarity Stamp Challenge...ends today typical me last minute, just as well this was a quick make!


Happy Crafting Everyone!!

Hugs
Emma xx

Challenges:
http://claritystampchallenge.blogspot.co.uk/2014/05/challenge-15.html
http://cheerfulstamppad.blogspot.co.uk/2014/05/challenge-87-use-sentiment.html
http://ttcrd.blogspot.co.uk/2014/05/ttcrd-challenge-may-27-to-june-2.html
http://craftcreatoins.blogspot.co.uk/p/new-challenge.html

Sunday, 25 May 2014

Aged Mahogany Birthday Card

Hi Folks!  Well I shall end this week with a post of the Birthday Card that I made for my husband's 50th. He loved the picture that I made for him by the way (http://emmburns.blogspot.co.uk/2014/04/hi-folks-another-little-post-from-me.html  - posted 29th April)  I made his card to match the picture.

I started with a square of Clarity Coated Card (cut down from the A5).  I masked off the edges with low tack tape and using Ranger Distress Ink - Aged Mahogany I stamped my tree in place.  The tree is actually three stamps, two Split Trees - a left and a right. Also a single stem of Birch Leaves (it comes in two sizes, I used the small one here).  I then stamped the floral border along the bottom of the card.  This stamp comes from the new Gardening Set.


I did quite a bit of secondary stamping with this card, it helps to give the final image more depth.


I then took some roughly torn copy paper and shaded in the background with the same ink and my trusty Brayer (BOB). I added the Floral Branch and the Birds from theBirdhouse and Garden Set along with the two stamps from the Happy Words Set.

I then removed the low tack tape, gave the card a polish (it comes up with a lovely sheen and makes it look as though it has been professionally printed.


I took a piece of scrap card and using my ink pad directly to it, I coloured around the edges.  I then attached my polished card to it using double sided tape and then trimmed it using my brilliant Perfect Layers Ruler. You can get them from http://www.joannasheen.com/  This I then attached to a Brilliant White 8 x 8 inch card and the result is :


Unfortunately my photography is crap and doesn't show up how white the card is or how I have deliberately not shaded in any sky.  I felt that using such a dark colour on the card needed some balance with the white. 

I hope you like it as much as I do.  I would love to hear your comments, I read and appreciate every one of them and I do try my best to respond as soon as possible.

Happy Crafting

Hugs 

Emma xx

I am entering this in the following challenge:

http://allsortschallenge.blogspot.ca/  Birthday.


Friday, 23 May 2014

Stag and Deer landscape card

Morning Folks!  What a lovely sunny day it is going to be here in South Ayrshire, Scotland.  I was up early to watch the sunrise from my back garden.  The sun comes shining through a bunch of trees on the horizon and the glow coming through is fantastic.  So it may seem strange that the following card actually looks like a winter scene.

This card was made for a man's birthday and the request was for a Scottish feel but not to use too many colours.  I had just got my new Woodland Set from Clarity Stamp that day in the mail so I decided to use this wonderful Stag from it. Thank you Barbara Gray and the team at Clarity Stamp for making him.  

I stamped directly onto a Cream Satin 8 x 8 inch card blank using Ranger Distress ink - Chipped Sapphire. I then put a border around the card using low tack tape covering the back end of the stag.   


I then stamped the Forest Ridge using Ranger Distress Ink - Faded Jeans followed by the Deerscape in Chipped Sapphire. 
I added some Birch leaves at the top and sides with the Chipped Sapphire.  I stamped twice to give the Faded effect.

I also added some shading to the Deerscape using a make-up sponge and a bit of torn copy paper.  I lifted the low tack tape at the Stag and using the same technique I added some shading to him.

I then added the slanted Happy Birthday again in Faded Denim.

Next I put some shading with the Chipped Sapphire around the edges of the picture and I decided to add a grassy edge to the bottom  using the long stamp from the Winter Trees Set From Clarity Stamp.

Finally I used a Pro Marker - Indigo Blue to go around the edge to give the effect of the picture being mounted onto the card.


This was a very quick card to make...it just seems longer in the way I tell it!

That's all for today and hopefully I will remember to do another post tomorrow...old age getting to my memory!

Happy Crafting everyone.

Hugs 

Emma xx

Wednesday, 21 May 2014

Moon Fairy Dreams

Hi Folks!  Hope you are all well out there.  What a busy couple of weeks it has been for me and once again I forgot to post my Blog...slap on hand.  So over the next couple of days I WILL post a few more cards that have been made recently.


Today's contribution was made using the Moon fairy stamp from Clarity Stamp (my fav) along with the verse May all Your Dreams Come True, which is of course another Clarity Stamp.

To begin I stamped in clear versamark both stamps onto White Clarity Coated A5 Card.  I had laid a border around the card using masking tape and I also put a piece over the card to separate the picture from the words.


I laid a mask over the moon fairy ( supplied by Clarity Stamp) then with Chipped Sapphire Distress Ink, loaded onto my brayer and blending it on my splodge mat. I worked on the top part first (covering the bottom half with copy paper). Then I did the same for the word area.  I did this as I wanted to shade in the corners a bit more for each area.


I removed the masking tape and disaster struck!  I had obviously not de-tacked the masking tape enough and it tore away the coating on the border so I had no choice but to trim it back taking out the white border altogether.   I still had the centre piece to do.  So taking an Indigo Blue Pro Marker pen I coloured a length of white gauze ribbon and with a piece of foil and a die I cut out a buckle and of course you can see from the photo I threaded the ribbon through (I did have to fold it a bit first).  I attached this at the back of the card with double sided tape.

I attached a piece of pale blue mottled backing paper and used a perfect layer ruler to trim to give me a bit of a border.  I then attached this to a white card blank.  I gave the card a bit of a polish and then I went over the moon fairy and words with a versamark pen and dusted on some Perfect Pearls  ( I did the talcum powder bit first) gave it another bit of a polish.  Finally I added stars with a fine white micron pen.


All I can say is thank you to the people who invented paper trimmers.  Certainly came in handy on this card!

I could probably do a tutorial on what not to do and if you do, how to get out of it...plenty of practise.

Happy crafting everyone!

Hugs Emma x

Tuesday, 13 May 2014

Bentley - Just For You Card

Hi folks!  Hope you are all well out there in Craft Land.  I have a quick card to show you all this morning and I will accompany it with as little 'waffle' as possible.

Starting with A5 white card which I then trimmed with a square die. I stamped my main image in Versamark then I used  BLACK embossing powder and heat set.  I then returned my 'square' back to the die before colouring.  This kept the edge white.

I coloured the Teddy with a Caramel Promarker adding a little bit of Blush to the ears and nose. I used Canary for the centre of the daisies.
 
I stamped the flowers from the image onto a post-it note (at the sticky end) and cut out the flowers and a little bit for the nose.


Next step, copy paper, Archival - Fern Green, Clarity Stencil Brush and put in a little bit of background.
I stamped the little bird on top of the sentiment in Black Archival then I stamped the flower in Archival Fern Green.  I used Distress Ink - Faded Jeans for the sky.  I then added some shading under the flowers and the sentiment.


(why is the flower then two tone)  I stamped it first onto copy paper using the Black ink, cleaned it slightly and then went into the fern green.  I removed 'square' from the die and I edged it with Marsh Green Promarker.  Mounted my 'square' onto a piece of Pale Mint card which had been through a Daisy embossing folder.  (I used the De-Boss side).  This was then mounted onto a Bright White 8 x 8 Square card blank.


The result is a lovely FRESH looking card suitable for any occasion.  

So now for a bit of 'waffle'...I took a lovely photo of this card, the lighting was perfect...then I realised that I hadn't taken the ickle bit of post-it note off the teddy's nose.  Uploaded the pics to computer then had to go back and re-photo (is that a word - no red line coming up under it?) only the lighting wasn't the same...TYPICAL!

It took longer to cut out the masks for the daisies than it did to make the whole card...didn't help that the end of my scissors are a bit blunt.  Any tips on how to sharpen curved scissors? 

The stamps used for this card were as follows:
Main Image - Teddy with Sentiment (one stamp)  Bentley Bear Daisy Chain Stamp and Embossing Folder Set...Free with  Cardmaking & Papercrafting Magazine.

Bird and Flowers - from Garden Set from Clarity Stamp.

Hope you like it.

Happy Crafting.

Hugs Emma x


Tuesday, 6 May 2014

Butterfly Montage

Hi folks!  Hope you are all well out there in Craft Land.  I am keeping busy myself.  Two family birthdays next week, one being my husbands 50th...he is catching up with me!  The other being my youngest daughter's 26th.  I have hubby's card in hand and I am just about to make my daughters but I thought that I would get this post done of a last minute card that I was asked to do ( someone forgot to get his wife a card and went off to work...just as well he knew about me as the poor man was working till way past shop closing and his wife was coming to pick him up).

So with only a little time at my disposal I decided to use a very lovely stamp from Clarity Stamp, the Butterfly Montage.  This is it stamped just in Archival Plum on white paper. (poor lighting)


I decided to stamp onto Pale Peach Parchment (the kind used for letter writing)  It has a lovely mottled effect.  I cut out a square from the parchment, taped the edges up with masking tape and then I stamped the Montage in Archival Plum. With my Clarity Stamp Stencil Brush I shaded around the outside edges (I covered the top end of the butterfly wing that sticks out over the edge as I wanted the Peach colouring to show through.

I removed the masking tape and stamped the Happy Birthday flourish on to the parchment. I used a
Brilliance Ink Pad - Pearlescent Crimson

(This stamp comes set at this angle)


Next step was to outline my Square and to add some detail to the butterfly. I used a Sharpie Pen - Berry for the edge and a Marvy Le Plume II - Cherry for the butterfly.  I laid my work out on my blank card and decided it was best at an angle but still a bit sparse.


So out came my Heat Resistant Acetate, Brilliance Ink Pad Pearlescent Crimson, Clear Embossing Powder and heat gun.  I stamped my Large Butterfly - which goes with the Montage - dusted my powder, used heat gun to set it and then cut out the butterfly.  I put a kink at base of each wing, attached it to the Montage with Clear Glue.

This still wasn't enough for me so I added the Small Leafy Swirl using  Brilliance Ink Pad Pearlescent Crimson to two corners and then set my Parchment back on its angle and attached with double sided tape onto an 8 x 8 inch cream satin card blank.


I could have also ran an edge along the shaded part to make it look like another layer but I didn't want to mess things up at this late stage.  I stamped the Leafy Swirls, "blotting before plotting" in the same position on the insert leaving space for the man to write his own message.

Glad to say his wife was very happy with the card...the excuse for her not getting it earlier - he was asking the staff he works with to sign the card too!

Hope you like it too.  

Happy Crafting


Emma xx

P.S.  I have just noticed that the Peach Parchment now looks Pink but on its own it is Peach...has to be the way I take photos. x