Thank you to all who read my Blog and leave a comment. I really do appreciate every one of them and do my utmost to reply as soon as possible.
Crafty hugs to all!


Thursday, 4 February 2016

More Groovi Parchment Design Team Samples

Hi Folks!  As I am unable to craft at the moment I thought it was time to get more of my blog posts up to date. So today I have uploaded pictures of my Groovi Design Team samples, made for the last two  Hochanda.tv shows featuring the lovely Maria Simms from Claritystamp Ltd.
Can you work out what plates I have used?


All of the Groovi Design Plates can be found by following the link GROOVI
Well that's me caught up with the samples from Maria's show and I think I have some from Paul Church and  Barbara Gray's shows still to show.
Barbara Gray will be back on our televisions this coming Sunday and Monday.  I hope you will be able to tune in to see her wonderful demonstrations and the beautiful samples from the rest of the Design Team.

Happy Crafting

Hugs 

Emma x

Sunday, 31 January 2016

Hello My Crafty Friends

Hi Folks!  How are you all doing. Me....getting older and falling to bits...doesn't help when my body keeps throwing me down the stairs...Yes I did it again the other night. Please no cracks about drinking....I wish I had been, then I might have bounced and not damaged my right arm ( my crafting arm).   Not looking for sympathy, just wanted to let you all know that I will not be crafting for at least the next week.  But that doesn't affect the next Claritystamp Challenge as I can assure you there are some really beautiful design team samples for you to see. There will also be the next Calendar Challenge for you to take part in.
Now I can't show you one of my cards today but I can and would love to show you all a photograph of some lovely Groovi Parchment Work that was sent to me.

Hilary is new to parchment work and to the Groovi System. She recently left me a wonderful compliment on my blog and since then Hilary has been having a "play" with the lovely art deco lady.  Now as soon as I saw this I asked Hilary if I could share it with you all. 
I am sure you will agree with me that she has made a lovely piece of Parchment Work with her design.  I think the phrase ..duck to water..comes to mind.

Well done Hilary and thank you for letting me share your work.

So that is all from me for today. Hopefully I will be allowed into my craft room later this week to get back to crafting. #bored senseless.

Happy Crafting

Hugs
Emma xx

Thursday, 21 January 2016

A Little look back (forgotten to post)

Hi Folks! Me again with 4 more Groovi Cards to show you.  
These were shown on HOCHANDA TV back at the beginning of December 2015.  
But just in case you missed them or wanted a closer look here they are.
I am busy sorting out all my computer files, along with making more cards and gifts but first on my list is to get all the photos of the Groovi Cards that I have made over the last few months (and forgotten to post....oooops) up onto my Blog.
So over this week I shall get them uploaded for you to have a perusal at your leisure.

If you click on the actual photos, they will enlarge to give a better view


Three Wrens Nested Square Trees and Hills from Starter Kit


If anyone would like more details then please get in touch. 
You can view the Groovi Plates used to make these cards by pressing on their name, or you can press on the GROOVI badge over to the right of this Post and it will take you directly to the full range of Plates available if you so wish.  I do not receive any remuneration for showcasing the Groovi System, I just wanted to share the details of where you can get them as I think they are a fabulous item to add to anybodys crafty stash especially if you are wanting to try parchment work for the first time.  They give perfect results with beautiful line art from the get go.

Thank you for popping in.   Please feel free to leave a comment (I do like it when you do) and hopefully (if blogger works) I can reply.

Happy Crafting

Hugs
Emma xx

Monday, 18 January 2016

Groovi Trellis Parchment Box

Hi Folks!  Hope you are all well.  I am going to do a step by step for you today.  I hope you like it!

As you will know by now, I design Groovi Samples for Claritystamp Ltd.  I love the Parchment Embossing Plates that they have produced.  They really do make the art of Parchment Craft a lot easier to begin.  But not only that, the Groovi Plates are not just for cardmaking.  Aspects of the Designs on the Groovi Plates can be taken and mixed n matched with each other to create lots of different designs.

With that in mind, I used  the Octagon Plate, Sprig Plate, Nested Squares Plate, Trellis Plate and the Line Borders Plate to Design and make this lovely little Gift Box.  I then used the Tags Border Plate and the Sentiments Plate to make labels.
All of the Groovi Plates and the Starter Kit can be found by following the link to the Claritystamp Website.  It will take you to the full list of plates on offer.


I began with 2 sheets of White A5, 140 gsm Parchment
I used a Clarity Stencil Brush with Memento Teal Zeal to colour the Parchment.  I used my 'Best Craft Mat Ever' as the parchment didn't slip around and it is brilliant for blending.   Load up brush and simply swipe the colour over the parchment until you reach the depth of shade you require.  This is now the BACK of your work.

Rub Parchment all over with  a Tumble Dryer Sheet (TDS) Attach Parchment to the Groovi Plate Mate (GPM) with tape at 4 corners.
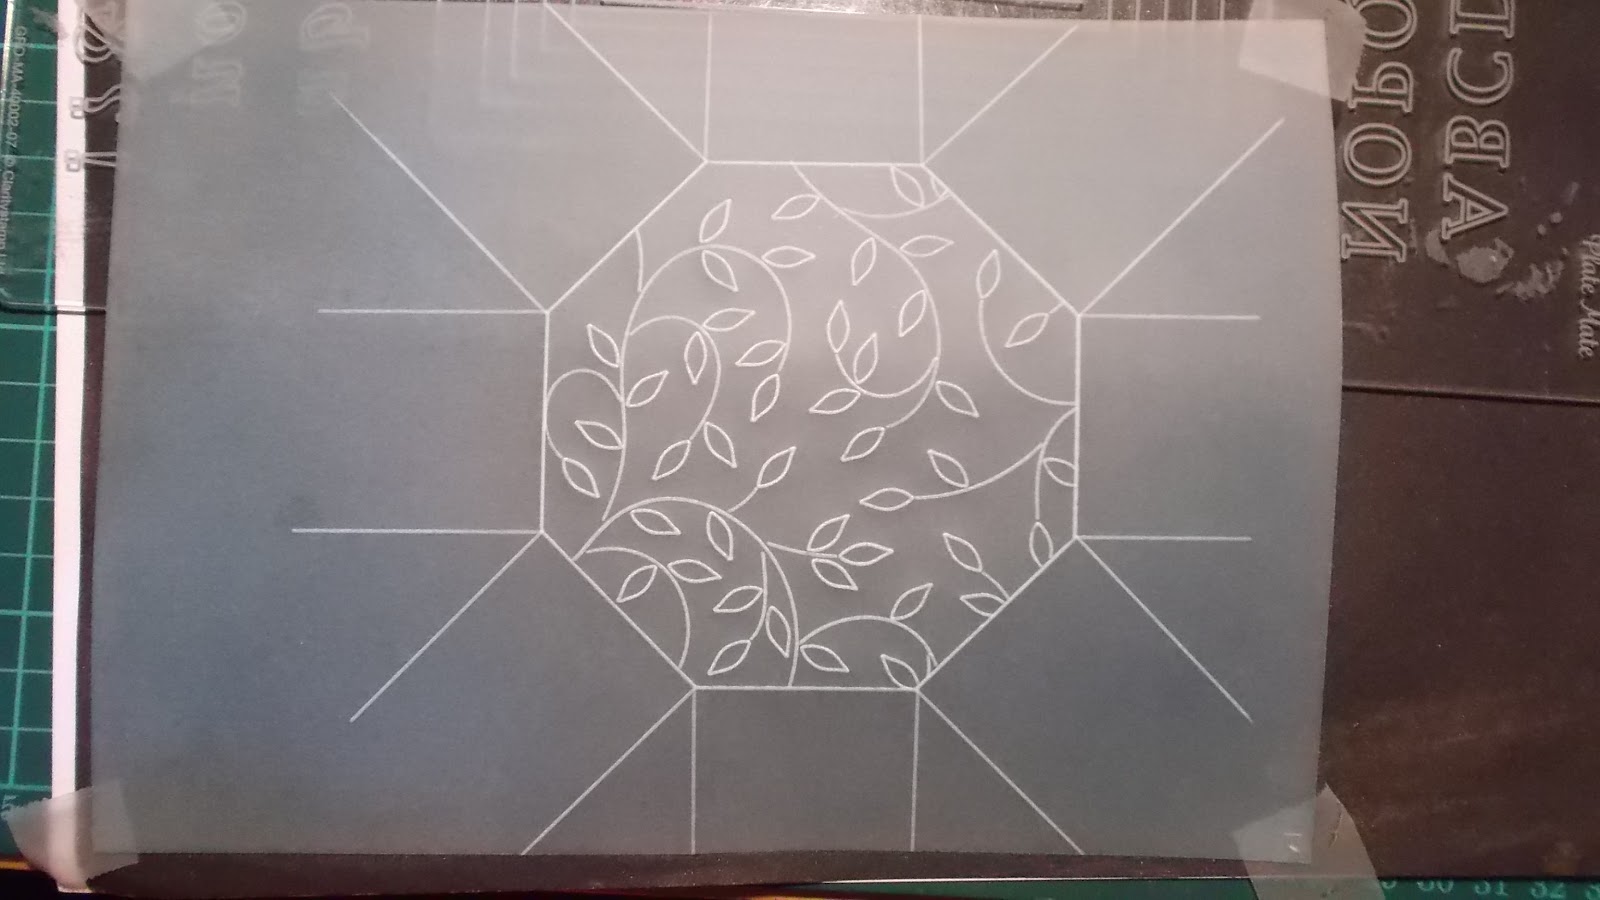
Place the Nested Octagon Plate into the GPM and using No. 2 Stylus emboss the 9th (from center) Octagon. Change to the Sprig Plate and again emboss the design.  Do not go over the outer line.


You are creating the Base of the Box.  By embossing a design here it helps firm up the structure of the Box.  You can colour your design or emboss it if you so wish.


Attach Line Border Plate to GPM with tape.
Remove Parchment (still working on the back)
Arrange the two opposing corners (as in photo) along the SINGLE line on the Border Plate, then emboss with the No. 2 Stylus.  Emboss the line out as far as you can.

REPEAT the process by turning your work around and embossing  the lines radiating from the corners.  It may help you to put a bit of tape on your parchment to stop it slipping.
Insert the Nested Squares into the GPM.  Look at the photo on the right and you will see that I have placed the line of the embossed octagon onto a line of the Nested Square Plate. Tape parchment in Place and Emboss the 5th line from the edge of the Octagon.
This now gives you the height of your box. Turn Parchment around and REPEAT embossing on the 5th Line until you have 8 Rectangles radiating out from the Octagon

You can add decoration to the rectangles at this point...please see note below


Turn work over (front), trim along the outer edge of the Rectangles as in the picture on the Right.
Cut from the corner join on the RIGHT of each Rectangle to the outer edge.  (cut on the White Line)
You now have a flap attached to the LEFT of the Rectangle. (as in Picture below)


PLEASE NOTE: At this point I went back to the Sprig Plate and continued the design up the sides of the box.  You do not need to do this.  I wanted the design to flow around the box so I needed to wait until I had cut away the flaps. I would advise anyone not confident or experienced enough Not to wait until the excess parchment is cut way to do this, as you may ruin your design.

Attach a strip of Red Double Sided Tape as near to the white line then trim off the excess parchment as in picture.
Fold along all the white lines and crease ***
Remove Tape backing and firmly attach the flap putting it behind the edge of the rectangle and press into place.
You now have your Box Base.

TIP ***Crease the side panels so that you can see the white line from the side view.

Are you still with me?
Go get a cuppa....I'm going for one....be back soon !!!!

Well I definitely needed that.  The box didn't seem to take so long when I was actually doing it and now there is the more intricate top to do....what have you let yourselves in for ........
Ready?
As you can see from the picture above, I have  gone back to the GPM, Octagon Plate with 2nd piece of Parchment.  I embossed the lines of the 8th and 9th Octagon. (don't forget to rub parchment with TDS)  Changed Groovi Plate to the Sprig and PARTIALLY embossed some of the design within the inner octagon.  
I then changed to the Trellis Plate and where I had embossed the Sprig and embossed the pattern of the Trellis making sure not to go through the lines of the Sprig. 
Now I then lifted the GPM and placed the Sprig Plate on top of the Trellis Plate and laid the GPM back down on  top with my parchment still attached.  If you have Black Card underneath you can see both designs through the parchment.  This enabled me to add more of the Sprig leaving out  where the Trellis lines were.  Removing the Sprig Plate and then just embossing the rest of the Trellis Plate with the result being the Sprig looking as though it was weaving through the Trellis.
I then used No. 4 and No. 3 stylus to do the whitework on the leaves.
  
I followed the instructions for making the Rectangles in the same manner as the Box Base only this time just using the Nested Squares Plate in place of the Line border Plate. I needed to score the line to complete the rectangle on the 3rd line from edge of Octagon as in the Picture.


Next I removed the parchment from the GPM and attached it to a Bold Straight Grid and proceeded to emboss Dots within the Border on top of the Box.  No. 2 Stylus does the trick.
Back to GPM, Trellis Plate. I embossed the pattern of the Trellis on each of the 8 sides and using a Bold Needle Tool to pierce the parchment within the Trellis Design and along the outer edge of each Rectangle.

I used parchment Scissors to cut away all the pierced parchment which left me with my box lid

After Folding and creasing the side panels ****I trimmed the flap on the sides of the box lid with scissors.
I used a cocktail stick to apply some Pergamano Glue to the flap...only a small amount is needed.
I applied a little pressure for a moment before moving on to the next flap.


TIP****Crease the Side Panels so that you can see the white line from the top.


Now using scraps of Parchment.  I embossed 3 tags from the Tag Border Plate all the same size. I pierced around them then added a little embellishment.  The top one has To: on it with a little bit of sprig pattern, the middle has From: on it with a little bit of  Sprig on it and the 3rd has my details handwritten on it.  I cut them out with Parchment Scissors then they were tied to a Pale Blue Satin Ribbon and this was threaded through the trellis.

And just in case you forgot what you were making


Now you don't have to copy my exact design, it can be so easily changed with the amount of Groovi designs now available.  The box can be made larger by using A4 or 8 x 8 Parchment. You can leave the sides blank or make the base a stronger colour for contrast....the list is endless it is now up to you and I would love to see you have a go at this.  If you do, take a picture and send it to me (make sure you have your name on the front of the photo) and I will showcase your make for you!

Happy Crafting 
I look forward to seeing what you all do

Hugs 

Emma xx

Friday, 15 January 2016

Groovi Samples Quiz

Hi Folks!  Well what do you know, I have some blog posts that I never got around to posting.  Silly me!  I came on here to do a tutorial of a parchment box that was shown on Wednesday this week on Hochanda tv.com.  It was for the Groovi Show with Maria Simms.  But then I noticed that I had a few draft posts! As I will not be doing any crafting today I thought I had better get around to getting that sorted out first!
Now I had a little quiz going with a lovely friend on FB as to what plates were used to make a particular sample.  So I thought that I would continue it here.  (sorry Lisa P....you have to choose a different card lol) If anyone can list the plates used to make a particular card (just pick one), then leave the list in the comment box below,  I will pick a winner at random and the prize will be a copy of the particular card that they chose to comment on.   I shall announce the winner on the 20th January and make arrangements to post out the prize.  I will then do another Groovi Quiz for the next set of samples.

First up are my design Samples for  the Barbara Gray show, which was aired on the 3rd January 2016
(I do have older shows to post on...ooops!)
If you click on any of the pictures they will enlarge for you to get a better look.

.


 I hope you like my samples and that you join in with my little quiz.
I look forward to hearing from you.
Until then
Happy Crafting!

Hugs
Emma xx

Friday, 1 January 2016

Happy New Year and Thank You!

Hi Folks!  HAPPY NEW YEAR TO YOU ALL.  
Hoping that everyone has peace, love and joy in the coming year.

I would like to say a HUGE BIG THANK YOU to all my family, friends and followers, old and new for all the love, support and friendship that you have made me feel throughout the year.  I have received the most amazing compliments (which I hope I accepted gracefully lol).   I have been given the most wonderful hugs (actual and virtual). I have met some really amazing, talented, friendly people this past year.   You all made my year wonderful!
And for that I would like to share this card with you all!


This card is my design sample for the Claritystamp Challenge for January
 I can hardly believe how quickly 2015 passed.  

This months Challenge is Say it with Flowers.

I took a piece of 7 x 7 Gelli Card, placed the square 7 x 7 Stencil on top (secured with tape to make a hinge at the top).
I stamped the Thank You through the aperture with Archival Fern Green, then using a Clarity Stencil Brush and Adirondack Pesto  I lightly brushed around the inner edge.  I then lifted the stencil up on its hinge and placed the inner square of the stencil over the sentiment (the shading comes in handy for keeping it straight)
To build up the design I stamped the Floral Border around the edges (Fern Green). I then added the Edelweiss in the corner. I used this stamp to make 4 masks from post-it notes and put them in place. 
I stamped the Lily of the Valley stamp over the top, removed the masks and then went on to colouring using ProMarkers.
 I used 6 colours in all. Moss for all the leaves, Canary and Gold for the tiny flowers, Poppy and Aubergine for the little fuchsias, Henna and Gold for the Edelweiss and Henna on the Sentiment.

I used the Moss with a ultra fine nib to go around the edge of the thank you square. Just as well that I decided to go with a squiggly line....my hands were shaking with the cold at this point - heating packed in and temperature didn't half drop!

I then dropped the Square Stencil back in place and used a makeup sponge to add a bit more colour to the corners using the leftover ink from my brushing.

I trimmed the card back and with a Grey Sharpie Pen went around the edge.  I held my pen at an angle so that I would just get a very fine line.  Then I mounted the design onto a card blank.

I hope you like my design, maybe some of you will be inspired to enter the challenge yourselves!
There is a £50 gift voucher for Claritystamps Ltd up for grabs and a guest spot on the design team!
The rules are very simple and can be found following this link:  Rules

So now to get on with creating, I know that I certainly have a few things to make! 

Much love and hugs to everyone!

Happy New Year
and 
Happy Crafting

Emma xx

Monday, 14 December 2015

Groovi Madeleine at 30 lol!

Hi Folks.  Hope you are well.  I have a 30th Birthday card that I was commissioned make to share with you today and as you will have guessed from the title, the card was made using the Madeleine Groovi Plate from Claritystamp.

The Groovi Plates used were: Madeleine, Nested Oval, Lace Border, Art Deco Floral Border, Sentiment Border, Nested Square, Dotted Line Border
The Parchment is A5 140gsm From Claritystamp used in conjunction with the Groovi Plate Mate.

I love the designs that you can achieve with the Groovi Plates.  So easy to get perfect lineart
As you can see, the card is made up of two panels using the Nested Square Plate to make a rectangular frame....so easy to extend the line of the square.
I have used Tinta Gold Ink and also Tinta Pearl to add a bit of colour to the Oval Frame, Flowers and the Lacy Border.  I embossed the dots in the border.  I also decorated the Flower in Madeleine's hair with the Tinta I used a large and medium embossing tool to create the shading in the hair (in Clarity terms 4 and 3)
For the second panel I used the nested square and the art deco border plate.  With the lines on the Blue Mat that comes in the Groovi Starter Kit I was able to space out the sentiment (forgot to mention that the 30th is on the Months Border Plate ooops)


Once again I used the Tinta Pearl and Gold to add decoration to the flowers. I used my mapping pen to add gold to the edges of the flowers and to the sentiment.

I added a couple of cut out flowers to the design just to finish it off.  I pierced around the edges using a fine straight grid, fine two needle tool and parchment scissors.
A little bit of Perga Glue behind the embossing and attached to Black Card.  Before attaching to a White Card Blank I took a Gold Sharpie pen to the edge of the black card.
I am very pleased to say that the Birthday Girl loved it (that is always a relief lol)
I will have more Groovi to post this week...some of my samples of the new Groovi Plates recently shown on Hochanda TV, so until then...
Happy Crafting

Hugs  Emma x


Tuesday, 1 December 2015

Last Claritystamp Challenge of the year!!!

Hiya Folks!  Hope you are all well.  I bet you are all busy making Christmas Cards and buying presents......I will let you into a secret.....I haven't done any of that!!!!  Had it all planned out - even had the start date for my own cards marked on the calendar and the time has jut disappeared!!!  There will definitely be some late nights ahead for me.

So it is the last challenge of the year for Claritystamp but we will be back with a new one in January 2016!!
This month the challenge is no. 34 A Christmas story.  This is my Design Sample.  I have used a mixture of Groovi Plates along with some Traditional Parchment Craft techniques for you to peruse.


Step 1 Tracing
Ink up the Merry Christmas stamp with a Dark Ink directly onto copy paper.
Tape an A5 Piece of Parchment over the top.....make sure it is secure all round.
Also make sure you are on a firm clean surface, then with a White Leaded Pencil, TRACE the sentiment.   (if you go squint or wobbly you can erase the pencil marks and start again) This becomes the FRONT
once finished remove tape and then place parchment FRONT DOWN onto your Embossing Mat

Step 2 Line Art
a)  Rub over the BACK of the parchment with a Tumble Dryer Sheet.
Emboss the Pencil Lines using a Small Ball Tool (no. 2 stylus from Claritystamp)
Do not Press hard but take your time going over the pencil lines.
After you have gone over the lines evenly, rub out the pencil lines.

b)  Fit the Nested Square into Groovi Plate Mate and attach Parchment Front Down.
Emboss the 2nd and 3rd square in from the Outer Edge using the no.2 then no.3 Stylus
Change Groovi Plate to the Netting Plate, Emboss the Lines and Dot that show between the Square Frame using the same order of Stylus.

c)  Change Groovi Plate to Snowflake Plate and Emboss hanging Snowflakes using the no. 1 stylus.
Remove Parchment from Groovi Plate Mate and Place onto Embossing Mat.

Step 3 Embossing - Whitework
Begin with no 4 Stylus.  With smooth, light, even strokes emboss part of the letters.  You can emboss the top half or the bottom half, the other half will be left blank for colouring.
To achieve whitework you have to be gentle when embossing.  You make a smooth up and down motion while travelling from one side to the other of the line art.  Repeat the same motion coming back the other way.  Check your work....you will notice the difference.  You begin with the largest ball and after you have shaded an area (got rid of the grey) you can then go over your work with the next size down of ball tool and repeat the same motion until you are happy with the depth of white. Don't be tempted to over emboss as your parchment will 'crack' and remember you can leave your Parchment to rest for a while and then go back to it.

Step 4 Colour
I have used a Distress Marker - Festive Berry to colour on the BACK of the parchment.  But you can use another colour or indeed another type of pen or pencil if you so wish.  At the time of making this card I hadn't yet decided on a colour so I waited until I was finished piercing and cutting before adding the colour.

Step 5 Piercing
Lay your Parchment onto a Piercing Mat (not an embossing mat....if you put holes into your embossing mat it cannot be used for embossing as your work will get ruined) Using a Fine TWO NEEDLE tool Pierce along the inside of the lines between the Frame.  Take Care not to pierce into the line. To Pierce the Parchment, Place your two needle tool upright over your starting point and press through the Parchment.  This makes TWO holes.  Take your two needle tool and place one needle into the furthest away hole, check your alignment before pressing down to make another hole.  You simply repeat the process until you have gone all the way round and meet up with the first hole that you made. Pierce the small Triangle that has formed in the same manner and then Pierce along the outer edge once again making sure NOT to pierce the Line.
N.B.  You can use a Bold Two Needle Tool if you wish. Just be careful not to go too near the lines.

Step 5  Cutting
Lay the edge of your Parchment that you are cutting onto a Cutting Mat and hold the rest gently in your other hand. You will have to reach over your work to cut the edges that lay along the outer line. Turn your work as you cut....no arms sticking up at awkward angles lol.  Start cutting the small triangles first, followed by the other area inside the frame and finally the outer edge.  To cut using Parchment Scissors or Snips, simply place the tip of the scissors into TWO holes, slightly turn your wrist towards you, then cut and retract the scissors. Move on to the next hole.  I find you get a very neat result if you cut the hole nearest you then work moving away from yourself. Always keep your scissors pointing toward the holes....if you don't you will end up with uneven points or even points that are missing. You are cutting the Parchment that is sitting between each hole. So repeat what you have just done all the way around the area.  Once all the pieces are cut the excess parchment will fall away.

Step 6 Mounting
I mounted the Parchment using a teeny tiny amount of Perga Glue behind each Dot. I put some Glue onto my craft mat and I then used the blunt end of a wooden cocktail stick to apply a spot of it to the dots. The Glue dried clear and has not shown through as I had embossed the dots.
I mounted the Parchment onto a piece of wine coloured hand made paper.  I took a piece of white embossed dotty card and pulled a wine coloured sharpie pen along the edge.  Double sided Red Tape to join the two pieces together and again on the back of the white Dotty card and finally attaching this to a 6 x 6 Card Blank.

So there you have a Christmas card made using the NEW Groovi Parchment System and some basic techniques from Parchment Craft.
I hope you like it and maybe give it a try.  Whatever you decide to do for your entry I am sure it will be lovely.


why not pop on over to the Claritystamp Blog to see what the other ladies from the Design Team have made.  I look forward to seeing your entries.

Best of luck  
Happy Crafting

Emma xx